

Starting a worm bin can feel overwhelming for beginners, but understanding how to water soil blocks is essential for successful vermicomposting. Vermicomposting is simply the process of using worms to break down organic waste into nutrient-rich soil amendments.
Red wiggler worms are nature’s recycling champions. They consume kitchen scraps and transform them into valuable worm castings through their digestive process. These castings contain concentrated nutrients that plants absolutely love.

The key to thriving vermicomposting lies in maintaining proper moisture levels. Too dry, and your worms become stressed and less active. Too wet, and you risk creating anaerobic conditions that produce unpleasant odors.
Moisture management affects every aspect of your worm bin’s health. It influences decomposition rates, worm reproduction, and the quality of finished compost. Getting this balance right sets the foundation for a productive, odor-free system that efficiently processes your organic waste.
10 Step-by-Step Guide: How to Water Soil Blocks
Step 1: Test Current Moisture Levels
Before adding any water to your worm bin, assess the existing moisture content of your bedding materials. Grab a handful of bedding from different areas of your container. Squeeze it firmly in your palm. The material should feel like a wrung-out sponge—moist but not dripping wet.
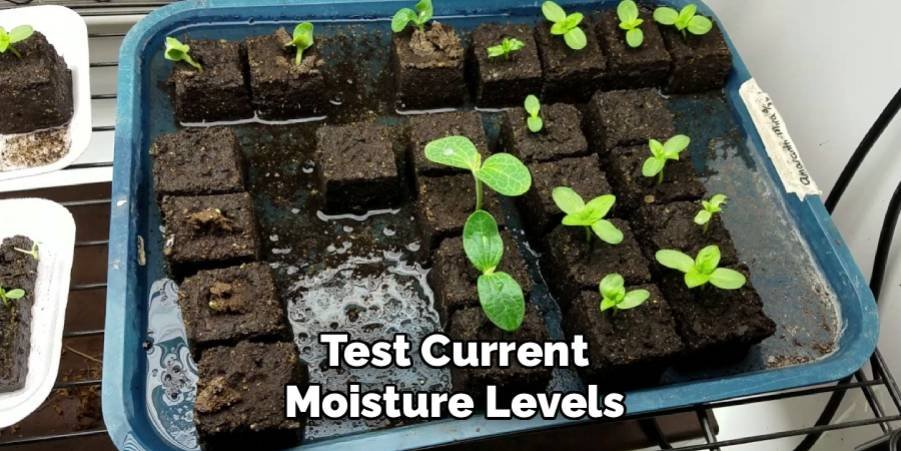
If water streams out when you squeeze, your bedding is too saturated. If it feels dry and dusty, you need to add moisture. This simple squeeze test becomes your go-to method for monitoring moisture throughout your vermicomposting journey.
Red wiggler worms breathe through their skin, so they require consistent moisture to survive. However, excess water displaces oxygen in the bedding, creating conditions where beneficial bacteria cannot thrive.
Step 2: Choose Your Water Source Wisely
The type of water you use significantly impacts your worm bin’s ecosystem. Tap water often contains chlorine and chloramines that can harm beneficial microorganisms and stress your worms. Let tap water sit uncovered for 24 hours to allow chlorine to evaporate naturally.
Rainwater provides an excellent alternative if you can collect it safely. It’s naturally soft and free from chemical additives. Well water works too, provided it doesn’t contain high levels of minerals or chemicals.
Avoid distilled water for regular use, as it lacks beneficial minerals that support healthy decomposition. Room temperature water works best—cold water can shock worms and slow their activity, while hot water can kill them instantly.
Step 3: Prepare Your Watering Tools
A spray bottle offers the most control when adding moisture to soil blocks. Choose one with an adjustable nozzle that can produce a fine mist or gentle stream. This prevents oversaturation and allows for even water distribution throughout the bedding.
A watering can with a fine rose attachment works well for larger bins. Avoid pouring water directly from cups or pitchers, as this creates soggy spots that can turn anaerobic quickly.
Keep measuring tools handy to track how much water you’re adding. Start with small amounts—you can always add more, but removing excess moisture requires more effort and time.
Step 4: Water Gradually and Evenly
Start by misting the surface lightly, then gently mix the bedding with your hands or a small trowel. This distributes moisture throughout the material rather than creating wet and dry zones. Work in sections, adding small amounts of water to each area.
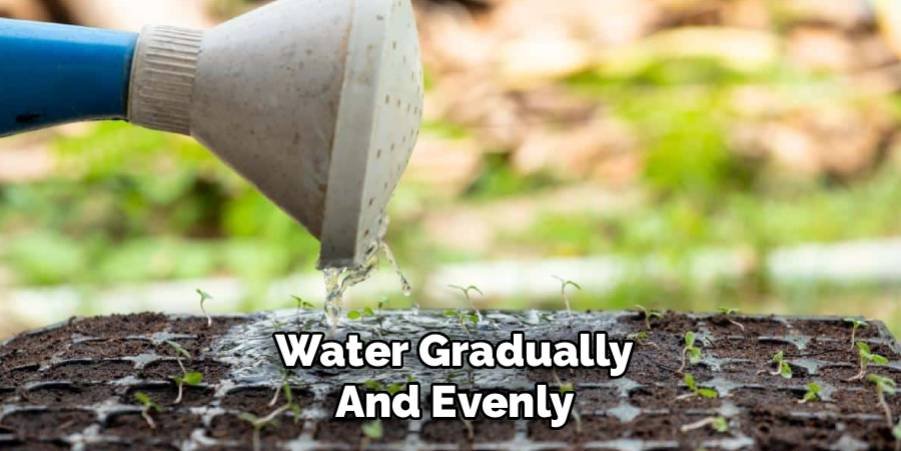
Pay attention to the edges and corners of your container, as these areas often dry out faster than the center. Mix gently to avoid compacting the bedding, which reduces air circulation essential for aerobic decomposition.
The gradual approach prevents shocking your worms and gives you better control over final moisture levels. Rush this process, and you risk creating waterlogged conditions that take days to correct.
Step 5: Monitor Worm Behavior
Healthy worms actively move through their bedding, processing organic matter continuously. If worms cluster near the surface or sides of the container after watering, they might be seeking better conditions. This behavior often indicates either too much or too little moisture.
Sluggish worms that barely move suggest environmental stress. Check moisture levels immediately and adjust accordingly. Active, pink-colored worms indicate proper hydration and healthy conditions.
Watch for worms attempting to escape from the bin. This dramatic behavior signals serious environmental problems, often related to moisture imbalances or pH issues that require immediate attention.
Step 6: Add Kitchen Scraps Strategically
Fresh kitchen scraps contribute significant moisture to your worm bin ecosystem. Wet scraps like melon rinds, tomatoes, and leafy greens release water as they decompose. Balance these with drier materials like shredded cardboard or newspaper.
Create pockets in the bedding for fresh scraps rather than spreading them across the surface. This concentrated approach helps manage moisture and prevents attracting unwanted pests to your vermicomposting system.
Bury scraps under existing bedding to maintain proper moisture distribution and reduce odors. The worms will find the food naturally while the covering helps regulate moisture release from decomposing materials.
Step 7: Adjust for Seasonal Changes
Summer heat increases evaporation rates, requiring more frequent moisture monitoring. Check your bin every few days during hot weather, as bedding can dry out quickly in warm conditions.

Winter heating systems can also dry out bedding faster than expected. Indoor bins near heating vents or radiators need extra attention during cold months when artificial heating runs constantly.
Seasonal humidity changes affect moisture retention too. Dry winter air pulls moisture from bedding faster, while humid summer conditions might reduce evaporation rates significantly.
Step 8: Create Drainage Solutions
Proper drainage prevents waterlogged conditions that kill worms and create foul odors. Drill holes in the bottom of plastic containers or use containers with built-in drainage systems.
Place a collection tray under your bin to catch excess water, known as worm tea. This liquid makes an excellent plant fertilizer when diluted properly. Empty collection trays regularly to prevent water from backing up into the bin.
Add coarse materials like small sticks or crumpled cardboard to the bottom of your bin. These create air spaces that improve drainage and prevent bedding from becoming compacted and waterlogged.
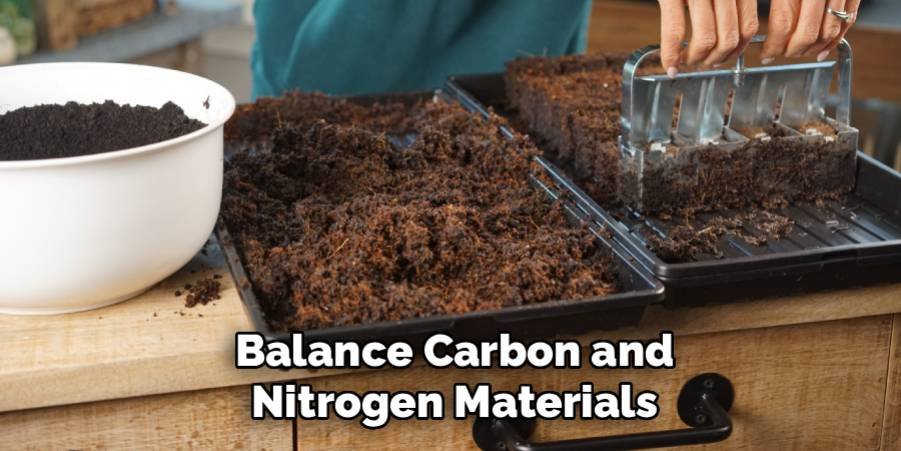
Step 9: Balance Carbon and Nitrogen Materials
Carbon-rich materials like shredded paper, cardboard, and dried leaves help absorb excess moisture while providing structure to the bedding. These materials prevent compaction and maintain airflow throughout the bin.
Nitrogen-rich kitchen scraps release moisture as they decompose. Balance wet scraps with dry carbon materials in roughly equal proportions to maintain optimal moisture levels naturally.
Monitor the carbon-nitrogen ratio ongoing. Too much nitrogen creates wet, smelly conditions, while excess carbon can make bedding too dry. Finding the right balance takes practice but greatly improves your vermicomposting success.
Step 10: Document and Learn
Keep a simple log of when and how much you water your bin. Note weather conditions, types of food scraps added, and worm behavior changes. This information helps you identify patterns and improve your watering technique over time.
Record any problems and their solutions. Did adding shredded cardboard fix moisture issues? Did certain foods create soggy conditions? This knowledge becomes invaluable for maintaining consistent bin conditions.
Share your experiences with other vermicomposters online or in local gardening groups. Learning from others’ successes and mistakes accelerates your own learning process and builds confidence in your skills.
FAQ
How often should I water my soil blocks?
Frequency depends on environmental conditions, container size, and bedding materials. Check moisture levels weekly by performing the squeeze test. Most bins need water every 1-2 weeks, but summer heat or dry indoor air might require more frequent attention.
What’s the ideal moisture percentage for worm bins?
Aim for 75-85% moisture content, which feels like a wrung-out sponge when squeezed. This level provides adequate hydration for worms while maintaining aerobic conditions necessary for proper decomposition and preventing anaerobic odors.
Can I use ice to cool and water my bin simultaneously?
Avoid using ice, as sudden temperature changes stress worms and can slow their activity significantly. Instead, use room-temperature water and provide shade or ventilation to manage heat. Gradual temperature changes work better for worm health.
Why does my bin smell after watering?
Overwatering creates anaerobic conditions that produce hydrogen sulfide and ammonia odors. Improve drainage, add dry carbon materials like shredded paper, and reduce watering frequency. Proper air circulation prevents most odor problems in vermicomposting systems.
Should I water before or after adding food scraps?
Water first to establish proper moisture levels, then add food scraps. This sequence prevents creating overly wet spots around fresh additions. Bury scraps in properly moistened bedding for best results and odor control.
Conclusion
Learning how to water soil blocks properly transforms your vermicomposting experience from frustrating guesswork into predictable success. The key lies in maintaining consistent moisture levels that support both worm health and efficient decomposition processes.
Remember that moisture management is an ongoing skill that improves with practice and observation. Start conservatively with small amounts of water, monitor your worms’ behavior closely, and adjust your technique based on seasonal changes and environmental conditions.
Your patience and attention to detail will pay off handsomely. Well-maintained worm bins produce high-quality castings that dramatically improve soil health and plant growth. The nutrient-dense compost you create reduces waste while providing your garden with natural, slow-release fertilization.
Successful vermicomposting connects you directly to natural recycling processes that have sustained ecosystems for millions of years. Your kitchen scraps transform into valuable soil amendments through the simple but remarkable work of red wiggler worms.
Your garden (and worms!) will thank you for the time invested in mastering proper watering techniques. The rich, dark castings you produce will become the foundation for healthier plants, reduced waste, and a more sustainable lifestyle that benefits both you and the environment.
About Ravuk Barg
B.Sc. Horticulture Science | Certified Master Gardener
Ravuk Barg has spent more than a decade with his hands in the soil and his head full of questions about why some gardens thrive while others struggle. What started as a single raised bed of tomatoes and basil in a modest backyard has grown into a deep, working knowledge of everything from seed germination and soil amendment to companion planting and seasonal pruning.
Over the years, Ravuk has gardened through drought summers, waterlogged springs, and pest invasions that would make most gardeners hang up their trowels for good. Those hard seasons, he’ll tell you, taught him more than any perfect growing year ever could. He writes from that earned experience—covering vegetable growing, ornamental planting, houseplant care, composting, and garden design with equal confidence and curiosity.
Philosophy & Approach
Ravuk’s approach to gardening is rooted in practicality. He favors organic methods not out of dogma, but because they work long-term—resulting in healthier soil, fewer inputs, and stronger plants. He has a particular fondness for heirloom vegetable varieties (the kind with proper flavor), unruly cottage-style flower beds, and the stubborn houseplants that everyone else gave up on.
The Mission: Give readers the honest, experience-backed advice that helps them actually succeed in their gardens—not just the ideal version, but the real one; weeds, failures, and all.
Education & Credentials
-
B.Sc. in Horticulture Science
-
Greenfield Agricultural University
-
Focus: Plant Physiology, Soil Ecology, and Sustainable Crop Production
-
-
Master Gardener Certification
-
Cooperative Extension Service
-
Focus: 200+ hours of hands-on practical training and community garden work
-
Continuing Education
-
Organic Pest Management
-
Native Plant Landscaping
-
Sustainable Crop Production