

Seeing your lawn after a vigorous scarifying session can be a shock. Instead of a lush, green carpet, you might be looking at a patchy, brown, and stressed-out yard. This initial appearance is completely normal and, in fact, a sign that you’ve successfully removed the suffocating layer of thatch and moss. The real work begins now: the recovery.
Understanding how to revive a lawn after scarifying is the key to transforming that bare-looking patch into the healthiest, most vibrant lawn you’ve ever had. This guide will walk you through the essential steps to nurse your lawn back to full health, ensuring your hard work pays off with beautiful, long-lasting results.
Why Scarifying Is Important
Scarifying, also known as dethatching, is a crucial maintenance task that can dramatically improve the health of your turf. Over time, a layer of dead grass, roots, and other organic debris, called thatch, builds up on the soil surface. A thin layer is beneficial, but when it becomes too thick, it acts like a barrier. This barrier prevents essential nutrients, water, and air from reaching the soil and grass roots.
Moss can also thrive in these conditions, further choking out the grass. Scarifying uses a machine with vertical blades to cut into the turf and pull out this excess thatch and moss. While it looks harsh initially, this process opens up the lawn, improves drainage, stimulates new growth, and makes it easier for the grass to absorb everything it needs to flourish.
8 Step Methods Guide on How to Revive a Lawn After Scarifying
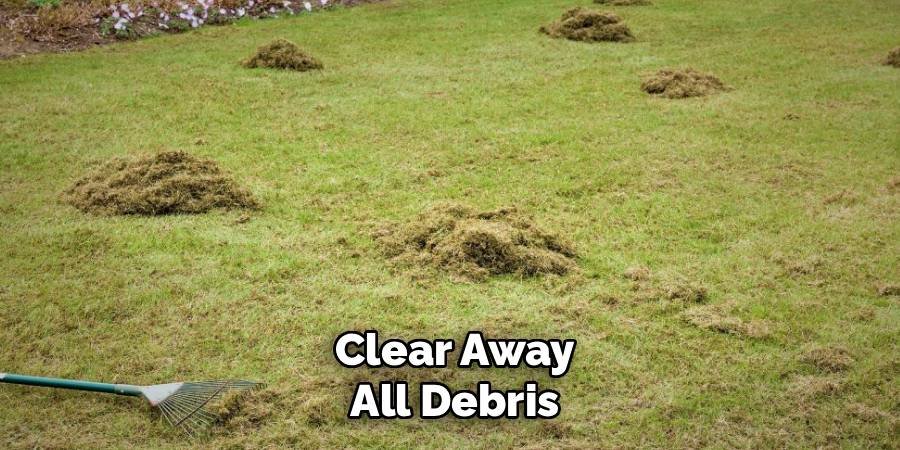
Step 1: Clear Away All Debris
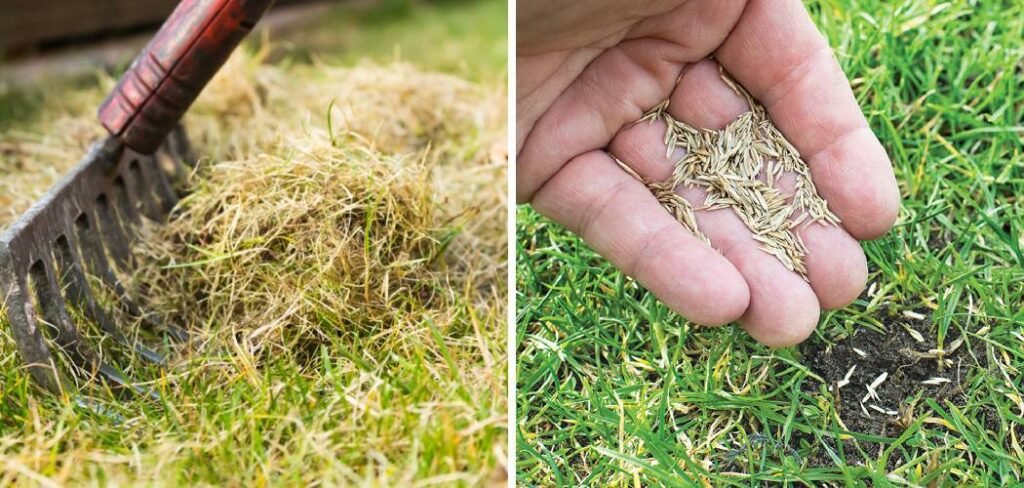
The first and most important step is to thoroughly clean the lawn. Scarifying pulls up an astonishing amount of thatch, moss, and other organic waste. Leaving this debris on the surface will smother the grass and undo all your hard work. Use a spring-tine rake to gently but effectively gather all the loose material into piles. Be meticulous with this task, ensuring you collect as much as possible. A clean surface is vital for the subsequent steps, as it allows seeds, fertilizer, and topdressing to make direct contact with the soil, which is necessary for successful germination and nutrient absorption.
Step 2: Aerate the Soil to Relieve Compaction
After clearing the debris, the soil is exposed and ready for aeration. Over time, soil becomes compacted from foot traffic, mowing, and even rainfall. Compaction squeezes the air pockets out of the soil, making it difficult for grass roots to grow deep and for water to penetrate. Aeration involves creating small holes in the soil to alleviate this pressure. You can use a simple garden fork for small areas by pushing it into the ground every few inches, or rent a hollow-tine aerator for larger lawns. This process improves drainage and allows oxygen, water, and nutrients to reach the root zone, creating the perfect environment for recovery.
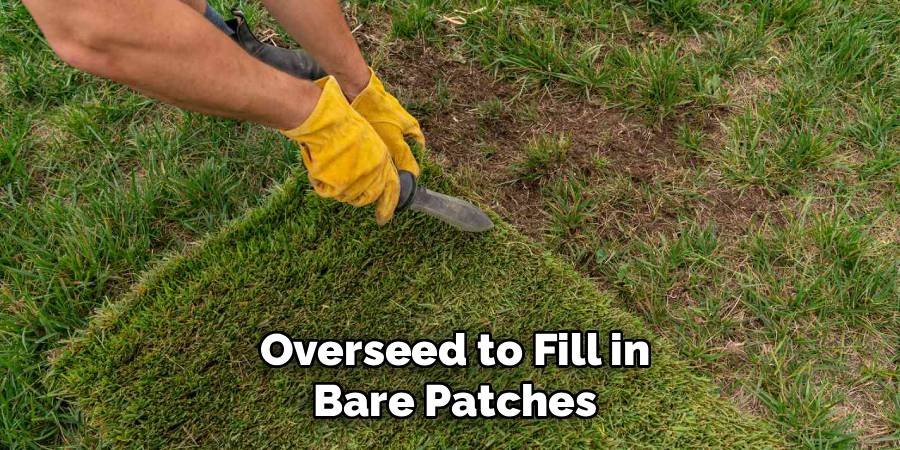
Step 3: Overseed to Fill in Bare Patches
Scarifying often leaves bare or thin patches, which are prime real estate for weeds. Overseeding is the process of sowing new grass seed over your existing lawn to fill these gaps and increase turf density. Choose a high-quality grass seed mix that is appropriate for your lawn’s conditions, such as its sun exposure and usage. A mix containing perennial ryegrass is often ideal for post-scarifying recovery as it germinates quickly. Distribute the seed evenly across the entire lawn, paying extra attention to the thinnest areas. This step is fundamental for achieving that thick, uniform, and lush appearance.
Step 4: Apply a Topdressing
Once you have overseeded, applying a topdressing is highly beneficial. A topdressing is a thin layer of a custom soil mix, typically composed of loam, sand, and compost. Spread it evenly across the lawn with the back of a rake or a shovel, aiming for a depth of about 1-2 cm. This layer helps protect the new seeds from birds and from drying out, improves soil structure, and adds valuable organic matter. It also helps to level out any minor lumps and bumps in the lawn, creating a smoother surface. The topdressing provides an ideal micro-environment for the new seeds to germinate and establish strong roots.
Step 5: Fertilize to Boost New Growth
Your lawn is now hungry for nutrients to fuel its recovery and the growth of new seedlings. Applying a specialized fertilizer is a critical part of knowing how to revive a lawn after scarifying. Look for a seasonal or a starter lawn feed that is rich in phosphorus, which is essential for strong root development. Potassium is also important for overall plant health and stress resistance. Apply the fertilizer according to the manufacturer’s instructions, using a spreader for even distribution. This will give both the existing grass and the new seeds the energy they need to grow vigorously and quickly establish a dense, green sward.

Step 6: Water Consistently and Correctly
Water is the final, crucial ingredient for a successful recovery. The new seeds need consistent moisture to germinate, and the existing grass needs it to recover from the stress of scarification. Water the lawn thoroughly immediately after applying the seed, topdressing, and fertilizer. For the next few weeks, aim to keep the top inch of soil consistently moist but not waterlogged. This may mean watering lightly once or twice a day, depending on the weather. A fine spray setting on your hose is best to avoid washing away seeds. Once the new grass is established, you can switch back to a deeper, less frequent watering schedule.
Step 7: Limit Lawn Traffic
During this delicate recovery phase, it’s important to keep foot traffic to an absolute minimum. The new grass seedlings are extremely fragile, and walking on them can easily damage or kill them before they have a chance to establish. The existing grass is also vulnerable as it puts its energy into repairing itself. Try to avoid walking on the lawn for at least two to three weeks. If you must cross it, use planks to distribute your weight. Protecting the lawn from stress during this period will significantly speed up its recovery and ensure a more uniform and healthy result.
Step 8: Know When to Mow Again
Your patience will be tested, but it’s important not to mow too soon. Wait until the new grass has reached a height of at least 2-3 inches (5-8 cm). For the first few mows, set your mower blades to a high setting. Cutting the grass too short will stress the young plants and hinder their development. A light trim will encourage the grass to tiller, which means it will produce more side shoots, leading to a thicker, denser lawn over time. Ensure your mower blades are sharp to make a clean cut and avoid tearing the delicate new blades of grass.

Frequently Asked Questions
How Long Does It Take for a Lawn to Recover After Scarifying?
Recovery time can vary based on weather conditions, soil health, and the aftercare you provide. Generally, you should start to see new grass shoots within 7 to 21 days. With proper watering, fertilizing, and overseeding, your lawn should look mostly recovered and green within 4 to 6 weeks. A full, dense recovery can take up to a few months, especially if the lawn was in very poor condition beforehand.
Can I Just Scarify Without Overseeding?
While you can scarify without overseeding, it is not recommended. The scarification process intentionally creates gaps in the turf by removing thatch and moss. If you don’t fill these bare patches with new grass seed, you are creating a perfect opportunity for weeds to invade and take over. Overseeding is a crucial step to ensure these gaps are filled with desirable grass, resulting in a denser, healthier, and more resilient lawn.
What Is the Best Time of Year to Scarify and Revive a Lawn?
The best time to scarify is during the active growing seasons: autumn or spring.
- Autumn (September/October): This is often considered the ideal time. The soil is still warm, which aids germination, and there is typically more rainfall, reducing the need for constant watering. The lawn has time to recover before winter dormancy.
- Spring (April/May): This is another good option, as the grass is entering a period of vigorous growth. However, a spring scarification can leave the lawn vulnerable to summer drought.
What’s the Difference Between Scarifying and Aerating?
Scarifying and aerating are both beneficial but serve different purposes. Scarifying focuses on the surface, using vertical blades to remove the layer of thatch and moss that sits on top of the soil. Aerating, on the other hand, deals with the soil itself. It involves creating holes in the ground to relieve soil compaction, allowing air, water, and nutrients to penetrate deeper to the grass roots. They are often performed together for a full lawn renovation.
Should I Water My Lawn Before or After Scarifying?
It is best to scarify when the soil is moist but not waterlogged. If the ground is too dry and hard, the scarifier’s tines will struggle to penetrate the soil effectively and may just bounce over the surface. If it’s too wet, the machine can tear up the turf and create a muddy mess. A good rule of thumb is to water the lawn a day or two before you plan to scarify if there has been no recent rainfall.
Conclusion
Reviving a lawn after scarifying can seem like a daunting task, especially when you’re faced with what looks like a destroyed yard. However, by following a structured recovery plan, you provide your lawn with everything it needs to bounce back stronger than ever. From clearing debris and aerating the soil to overseeding, fertilizing, and watering correctly, each step plays a vital role in the healing process. This effort is an investment in the long-term health and beauty of your turf. With a little patience and consistent care, you will successfully transform your patchy lawn into a dense, green, and resilient carpet. Now that you know how to revive a lawn after scarifying, you are ready to achieve professional-level results.
About Ravuk Barg
B.Sc. Horticulture Science | Certified Master Gardener
Ravuk Barg has spent more than a decade with his hands in the soil and his head full of questions about why some gardens thrive while others struggle. What started as a single raised bed of tomatoes and basil in a modest backyard has grown into a deep, working knowledge of everything from seed germination and soil amendment to companion planting and seasonal pruning.
Over the years, Ravuk has gardened through drought summers, waterlogged springs, and pest invasions that would make most gardeners hang up their trowels for good. Those hard seasons, he’ll tell you, taught him more than any perfect growing year ever could. He writes from that earned experience—covering vegetable growing, ornamental planting, houseplant care, composting, and garden design with equal confidence and curiosity.
Philosophy & Approach
Ravuk’s approach to gardening is rooted in practicality. He favors organic methods not out of dogma, but because they work long-term—resulting in healthier soil, fewer inputs, and stronger plants. He has a particular fondness for heirloom vegetable varieties (the kind with proper flavor), unruly cottage-style flower beds, and the stubborn houseplants that everyone else gave up on.
The Mission: Give readers the honest, experience-backed advice that helps them actually succeed in their gardens—not just the ideal version, but the real one; weeds, failures, and all.
Education & Credentials
-
B.Sc. in Horticulture Science
-
Greenfield Agricultural University
-
Focus: Plant Physiology, Soil Ecology, and Sustainable Crop Production
-
-
Master Gardener Certification
-
Cooperative Extension Service
-
Focus: 200+ hours of hands-on practical training and community garden work
-
Continuing Education
-
Organic Pest Management
-
Native Plant Landscaping
-
Sustainable Crop Production