

Creating a perpetually wet appearance for landscaping rocks transforms ordinary stone features into stunning focal points that catch light and add dramatic visual appeal to any outdoor space. Learning how to make landscaping rocks look wet is a valuable skill that can elevate your garden’s aesthetic without the ongoing maintenance of water features.
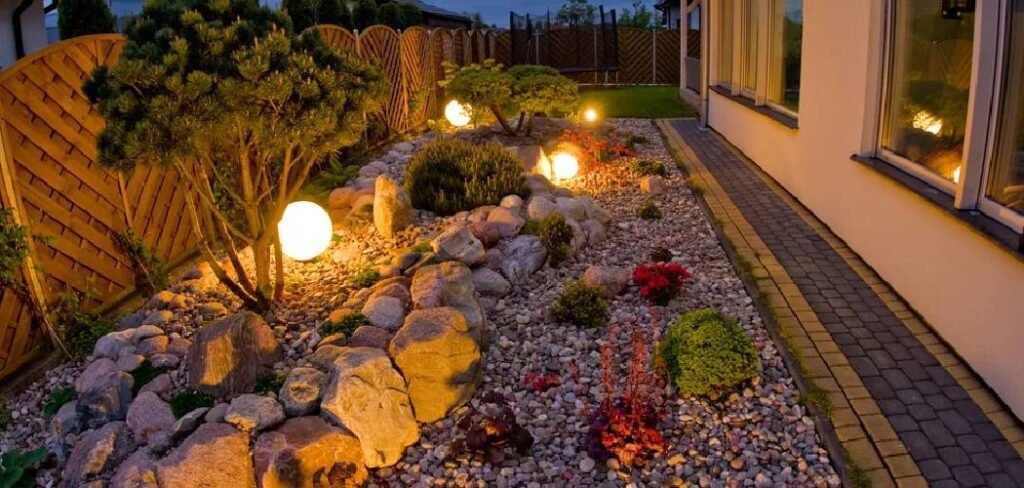
Many homeowners struggle with dull, lifeless rock installations that fade into the background. Wet rocks, however, showcase rich colors, enhanced textures, and a lustrous shine that creates depth and visual interest. The glossy surface reflects light beautifully, making even modest rock arrangements appear more expensive and professionally designed.
This technique works particularly well for decorative river rocks, lava stones, slate pieces, and granite features. Whether you’re enhancing a zen garden, creating a dramatic pathway, or highlighting water-wise landscaping, achieving that coveted wet rock appearance is simpler than you might expect.
Why You Need to Enhance Your Landscaping Rocks
Dry landscaping rocks often appear flat and unremarkable, failing to contribute meaningfully to your outdoor design. When rocks lack visual impact, they become mere space-fillers rather than design elements that enhance your property’s curb appeal and value.
Wet-looking rocks solve multiple aesthetic challenges simultaneously. They create focal points that draw the eye, enhance color saturation to reveal hidden beauty in stone, and provide textural contrast against plants and hardscaping materials.
The enhanced appearance also photographs beautifully, making your outdoor spaces more Instagram-worthy and impressive to guests. Professional landscapers frequently use wet-look techniques to create high-end appearances that justify premium pricing.
10 Step-by-Step Guide: How to Make Landscaping Rocks Look Wet
Step 1: Clean Your Rocks Thoroughly
Remove all dirt, debris, and organic matter from your rock surfaces using a stiff brush and garden hose. Stubborn stains may require a mild detergent solution or pressure washer on low settings. Clean rocks provide the best foundation for achieving a professional wet appearance.

Allow rocks to dry completely before proceeding. Any remaining moisture can interfere with sealer adhesion and create uneven coverage. This preparation step is crucial for long-lasting results that won’t peel or fade prematurely.
Step 2: Choose the Right Weather Conditions
Select a day with mild temperatures between 50-80°F and low humidity for optimal application conditions. Avoid windy days that can cause overspray or uneven coverage, and never apply sealers in direct sunlight on extremely hot surfaces.
Overcast conditions often provide ideal working environments. The rocks should be completely dry, and rain shouldn’t be expected for at least 24 hours after application. Proper timing ensures maximum product performance and durability.
Step 3: Select High-Quality Stone Sealer
Invest in a premium acrylic or polyurethane-based stone sealer specifically designed for outdoor use. These products resist UV damage, weathering, and foot traffic while maintaining their glossy wet appearance for years. Avoid cheap alternatives that may yellow or deteriorate quickly.
Read product specifications carefully to ensure compatibility with your specific rock types. Some sealers work better on porous stones like lava rock, while others excel on dense materials like granite or river stones.
Step 4: Gather Essential Application Tools
Assemble high-quality brushes, rollers, or spray equipment depending on your chosen application method. Natural bristle brushes work well for detailed areas, while foam rollers provide smooth coverage on flat surfaces. Sprayers offer efficiency for large installations.
Don’t forget protective equipment including gloves, safety glasses, and proper ventilation masks. Quality tools ensure even coverage and professional-looking results while keeping you safe during the application process.
Step 5: Test on a Small Hidden Area
Apply sealer to an inconspicuous test area first to evaluate coverage, appearance, and drying time. This critical step prevents costly mistakes and allows you to adjust techniques before treating visible areas. Different rock types may react differently to the same product.

Wait for complete curing before evaluating results. The wet appearance should look natural and enhance the stone’s inherent beauty rather than creating an artificial plastic-like finish.
Step 6: Apply the First Thin Coat
Work in manageable sections, applying thin, even coats rather than attempting to achieve full coverage in one pass. Thick applications often result in runs, drips, and uneven sheen that detracts from the natural wet appearance. Patience during this stage pays dividends in final results.
Maintain a wet edge by overlapping slightly with previously sealed areas. This technique prevents lap marks and ensures seamless coverage across the entire rock surface. Work systematically to avoid missing spots.
Step 7: Allow Proper Drying Time
Follow manufacturer specifications for drying time between coats, typically 2-4 hours depending on temperature and humidity conditions. Rushing this process compromises adhesion and final appearance quality. Use this time to clean tools and prepare for subsequent coats.
Avoid foot traffic or disturbance during the drying period. Even light contact can leave permanent marks or disturb the finish before it fully cures. Patience during this phase ensures professional-quality results.
Step 8: Apply Additional Coats as Needed
Most installations benefit from 2-3 thin coats for optimal depth and durability. Each layer builds upon the previous one, creating rich color saturation and the desired glossy wet appearance. More coats generally provide better longevity and weather resistance.
Evaluate coverage after each coat, paying special attention to porous areas that may require extra attention. The goal is uniform sheen and color enhancement across all rock surfaces.
Step 9: Inspect and Touch Up Problem Areas
Examine your work carefully in different lighting conditions to identify any missed spots, thin areas, or imperfections. Address these issues with light touch-up applications using a small brush for precision work.
Common problem areas include crevices, undersides of rocks, and junction points between stones. Proper inspection ensures consistent appearance and prevents premature wear in overlooked areas.
Allow the surface to dry completely after making touch-ups, as this will give you a clearer view of the final look. Patience during this stage is crucial to avoid uneven results or the need for extensive corrections later. Once satisfied with the finish, ensure all tools and materials are properly cleaned and stored. This not only helps maintain your equipment but also prepares everything for future projects. Proper care and attention to detail during the final stages will significantly enhance the lifespan and appearance of your work.
Step 10: Implement Ongoing Maintenance
Establish a regular cleaning routine using gentle methods that won’t damage the sealed surface. Avoid harsh chemicals or abrasive tools that can compromise the finish. Simple rinsing and soft-bristled brushes typically suffice for routine maintenance.
Monitor the sealed areas for signs of wear or fading, particularly in high-traffic zones. Plan for reapplication every 2-3 years or as needed to maintain the attractive wet appearance over time.
Maintaining Your Wet-Look Rock Installation
Regular maintenance preserves the stunning wet appearance and extends the life of your sealer investment. Weekly rinsing removes dust and debris that can dull the glossy finish, while monthly inspections help identify areas needing attention before problems become serious.
Avoid using pressure washers on high settings, which can damage the sealer coating. Instead, use gentle water pressure and soft brushes for cleaning. Remove fallen leaves and organic debris promptly to prevent staining or surface damage.
Reapplication frequency depends on traffic levels, weather exposure, and sealer quality. High-traffic areas may require touch-ups annually, while protected locations can maintain their appearance for several years with proper care.
Common Mistakes to Avoid
The most frequent error involves applying sealer too thickly, resulting in an artificial appearance and potential peeling issues. Multiple thin coats always produce superior results compared to single heavy applications that can trap moisture and fail prematurely.
Skipping the cleaning step or attempting to seal damp rocks compromises adhesion and appearance quality. Proper preparation takes time but ensures professional results that justify the effort and expense involved in the project.
Using inappropriate sealers for specific rock types or climate conditions leads to disappointing results. Research product compatibility thoroughly and consult with professionals when dealing with expensive or delicate stone materials.
FAQ Frequently Asked Questions
How Long Does the Wet Look Last on Landscaping Rocks?
Quality sealers typically maintain their wet appearance for 2-3 years with proper maintenance. High-traffic areas may require reapplication sooner, while protected locations can last longer. Regular cleaning and prompt touch-ups extend the life significantly.
Can I Use This Technique on All Types of Landscaping Rocks?
Most natural stones accept wet-look treatments well, including river rock, lava stone, granite, and slate. However, very soft or chalk-like stones may not be suitable candidates. Always test on a small area first to ensure compatibility.
Is It Safe to Walk On Sealed Rocks When Wet?
Sealed rocks can become slippery when wet, creating potential safety hazards. Consider adding anti-slip additives to the final coat for walking surfaces, or limit the technique to decorative areas only. Safety should always be the primary consideration.
What’s the Best Time of Year to Seal Landscaping Rocks?
Late spring through early fall typically provides optimal conditions with moderate temperatures and lower humidity. Avoid winter applications in freezing climates, as temperature fluctuations can affect curing and long-term performance of the sealer coating.
How Much Does It Cost to Make Landscaping Rocks Look Wet?
Costs vary based on rock quantity and sealer quality, typically ranging from $0.50-$2.00 per square foot for materials. Professional application adds labor costs but ensures optimal results. DIY projects save money while providing satisfying hands-on experience for homeowners.
Conclusion
Learning how to make landscaping rocks look wet opens up exciting possibilities for transforming ordinary stone features into stunning focal points that enhance your outdoor living spaces dramatically. This relatively simple technique delivers professional-quality results that rival expensive water features without the ongoing maintenance requirements or installation complexity.
The key to success lies in proper preparation, quality materials, and patient application techniques. While the process requires some upfront investment and effort, the long-lasting results justify the time and expense through increased property value and enhanced aesthetic appeal.
Your enhanced rock features will catch light beautifully throughout the day, creating dynamic visual interest that changes with lighting conditions. The rich colors and glossy surfaces complement plantings and hardscaping elements while requiring minimal ongoing maintenance to preserve their stunning appearance.
Remember that this technique works best as part of a comprehensive landscape design strategy. Consider how your newly enhanced rocks will interact with surrounding elements to create cohesive outdoor spaces that reflect your personal style and preferences.
With proper technique and quality materials, your landscaping rocks will maintain their beautiful wet appearance for years to come, providing lasting enjoyment and visual impact that transforms your outdoor environment into a true showcase of natural beauty and thoughtful design.
About Ravuk Barg
B.Sc. Horticulture Science | Certified Master Gardener
Ravuk Barg has spent more than a decade with his hands in the soil and his head full of questions about why some gardens thrive while others struggle. What started as a single raised bed of tomatoes and basil in a modest backyard has grown into a deep, working knowledge of everything from seed germination and soil amendment to companion planting and seasonal pruning.
Over the years, Ravuk has gardened through drought summers, waterlogged springs, and pest invasions that would make most gardeners hang up their trowels for good. Those hard seasons, he’ll tell you, taught him more than any perfect growing year ever could. He writes from that earned experience—covering vegetable growing, ornamental planting, houseplant care, composting, and garden design with equal confidence and curiosity.
Philosophy & Approach
Ravuk’s approach to gardening is rooted in practicality. He favors organic methods not out of dogma, but because they work long-term—resulting in healthier soil, fewer inputs, and stronger plants. He has a particular fondness for heirloom vegetable varieties (the kind with proper flavor), unruly cottage-style flower beds, and the stubborn houseplants that everyone else gave up on.
The Mission: Give readers the honest, experience-backed advice that helps them actually succeed in their gardens—not just the ideal version, but the real one; weeds, failures, and all.
Education & Credentials
-
B.Sc. in Horticulture Science
-
Greenfield Agricultural University
-
Focus: Plant Physiology, Soil Ecology, and Sustainable Crop Production
-
-
Master Gardener Certification
-
Cooperative Extension Service
-
Focus: 200+ hours of hands-on practical training and community garden work
-
Continuing Education
-
Organic Pest Management
-
Native Plant Landscaping
-
Sustainable Crop Production