

Creating stone borders for your garden is one of the best ways to make your outdoor space look amazing. Stone borders help separate different parts of your garden and make everything look nice and tidy. They stop weeds from growing and keep your plants in the right place. This guide will show you exactly how to make a rock border for garden areas using simple methods that anyone can follow.
Why Choose Rock Borders for Your Garden?
Stone borders are popular because they last a long time and look beautiful in any garden. Unlike wood or plastic borders, stones do not break down over time. They can withstand all types of weather and still look great. Stone borders help water drain properly and create a natural look that goes well with plants and flowers.
When you learn how to create stone borders for your garden space, you are choosing a solution that will work for many years. Stones come in a variety of shapes, colors, and sizes, so you can choose ones that perfectly match the style of your garden.
10 Methods on How to Make a Rock Border for Garden
Method 1: Simple Stacked Stone Border
The easiest way to create a stone border is to stack stones on top of each other. Start by digging a small trench about 4 inches deep where you want your border. Choose flat stones that stack well together. Place the largest stones on the bottom and the smaller ones on top. This method works great for straight borders and doesn’t require any special tools.
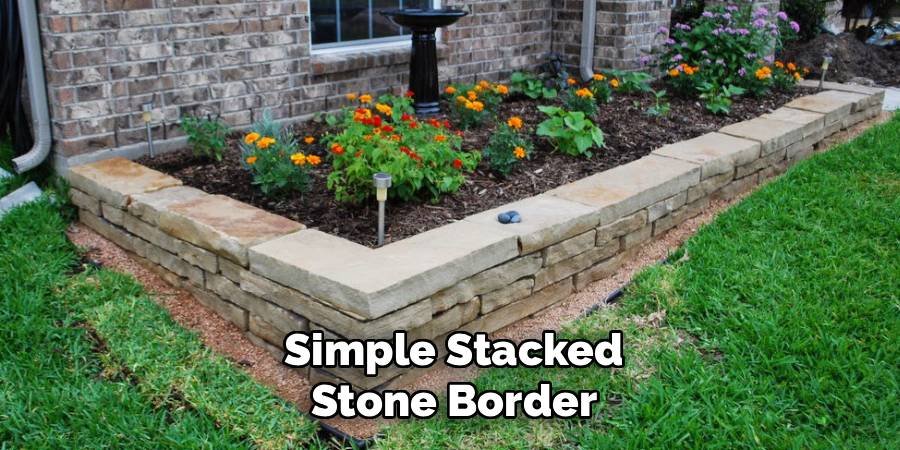
Make sure each stone is sitting firmly on the stone below it. You can use a level to check if your border looks straight. This simple method is perfect for beginners who want to learn how to make a rock border for garden areas without spending too much money.
Method 2: Mortared Stone Border
For a more permanent border, you can use mortar to hold the stones together. This method takes more work but creates a very strong border that will last for decades. First, dig your trench and add a concrete base. Then mix your mortar and apply it between each stone as you create the border. Wait for each layer to dry before adding the next layer. This method is perfect for areas where you need a long border or where the ground is sloping. The mortar will hold everything in place even in heavy rain or strong winds.
Method 3: River Rock Edging
River stones are smooth, rounded stones that create a natural-looking border. They are perfect for curved garden beds and areas around plants. Dig a shallow trench and place the river stones close together. You can use different shapes to create an interesting pattern. River stones work especially well around flower beds and water features. They allow water to flow easily and create a soft, natural edge that looks like it belongs in nature. This method shows how to create a stone border for garden areas where a gentle, flowing look is needed.
Method 4: Fieldstone Border
Fieldstones are larger, irregular stones that create a rustic, rural look. These stones are often found naturally in fields and have interesting shapes and colors. To use fieldstones, dig a deeper trench because these stones are usually larger and heavier.
To create your base, place the largest fieldstones first, then fill in the gaps with smaller stones. This method creates a very natural look that works well with cottage gardens and rural landscapes. The irregular shapes make each part of your border unique and interesting.
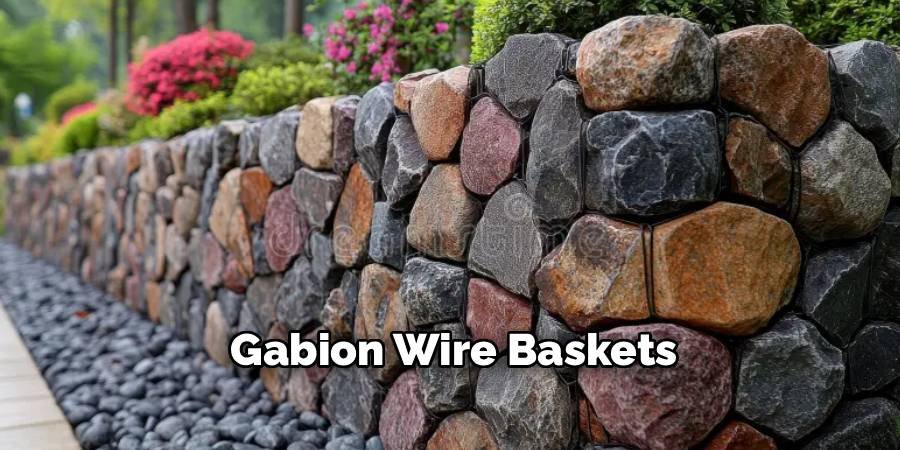
Method 5: Gabion Wire Baskets
Gabion baskets are wire containers that you can fill with stones. This modern method creates clean, straight lines and works well in modern gardens. You can buy gabion baskets online or at garden centers. Place your desired border where you want it and fill it with your choice of stones. This method is great for creating long borders or retaining walls. The wire keeps all the stones in place and allows water to flow through. Gabion borders look very professional and are perfect for modern garden designs.
Method 6: Buried Boulder Border
Large stones can create a strong border in your garden. For best effect, choose stones that are at least 18 inches wide. Dig a hole about one-third the height of each stone and bury it partially in the ground. This method works best when you space the stones evenly and choose stones that are similar in size and color. A buried stone border is perfect for separating large areas of your garden and creating eye-catching focal points.
Method 7: Slate Stone Edging
Slate stones are flat and thin, which makes them perfect for creating nice, precise borders. Stand the slate pieces on their edges in a shallow trench, pressing them firmly into the ground. You can create straight lines or gentle curves with the edges of the slate.
Slate comes in a variety of colors, from gray to green to purple, so you can choose the color that best suits your garden. This method shows how to make a rock border for garden beds that need a clean, formal look.
Method 8: Crushed Stone Border
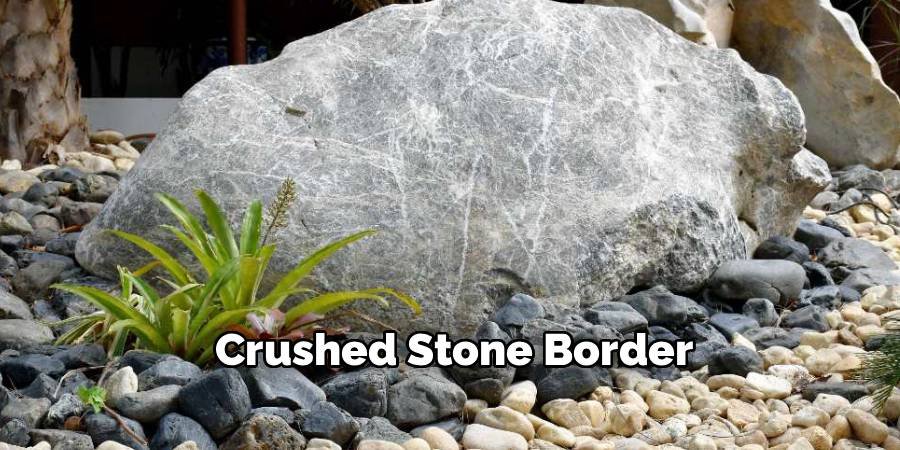
Crushed stone creates a different type of border that is much like a path or walkway. Use landscape fabric to mark out your border area, then pour crushed stone over it. This method works well for areas between garden beds and lawns. You can choose from a variety of types and colors of crushed stone. Some popular choices include pea gravel, crushed granite, and decomposed granite. This type of border is easy to install and maintain, making it perfect for large areas.
Method 9: Mixed Rock Border
Combining different types of stone creates an interesting and unique border. You can use large stones as anchors and smaller river stones to fill the spaces between them. Or combine slate edging with fieldstone accents. This method allows you to be creative and use whatever stones you can find or afford. It’s a great way to use up leftover stones from other garden projects. The key is to choose stones that work well together in terms of size and color.
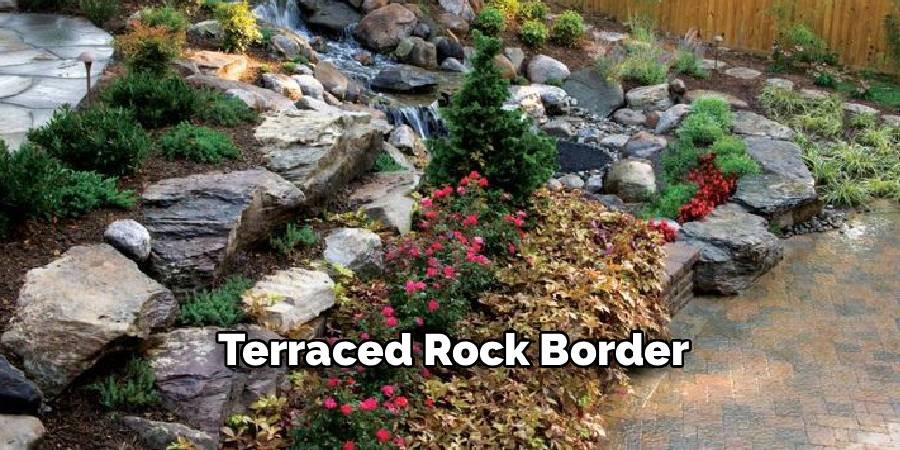
Method 10: Terraced Rock Border
On sloping land, you can create terraced rock borders that help prevent erosion and create planting areas. Build several low rock walls that follow the slope of your land. Each terrace creates a flat area where you can plant flowers or vegetables. Start at the bottom of the slope and work your way up. Make sure each wall is strong enough to hold the soil. This method is more challenging but produces beautiful results in hillside gardens.
Tools and Materials You’ll Need
Before you start learning how to make a rock border for garden areas, gather these basic tools:
- Shovel for digging trenches
- Level to keep borders straight
- Wheelbarrow for moving rocks
- Work gloves to protect your hands
- Measuring tape for planning
- String line for marking straight borders
- Hand tamper for packing soil
You’ll also need landscape fabric to prevent weeds and sand or gravel for creating a level base under your rocks.
Choosing the Right Rocks
The type of stone you choose will depend on your garden style and budget. Local stone is usually cheaper and looks more natural in your area. Visit stone yards and garden centers to see what is available near you. Consider the size and weight of the stone you can safely handle. Larger stones may require special tools to move and place. Smaller stones are easier to work with, but you may need more pieces to complete your project.
Maintenance Tips for Rock Borders
Once properly installed, stone borders require very little maintenance. Remove weeds growing between the stones and add new stones if any shift or shift over time. In cold climates, inspect your borders every spring and reset any stones that have moved. Clean your stones occasionally with a garden hose to remove dirt and debris. This will keep them looking fresh and shiny. A well-maintained stone border can last for decades without major repairs.
Frequently Asked Questions (FAQs)
Q: How deep should I dig for a rock border?
Answer: For most rock borders, dig a trench 4-6 inches deep. Larger rocks require a deeper trench, about one-third the height of the rock.
Q: What’s the best type of rock for garden borders?
Answer: River rock and field stone are popular choices. River rock works well for curved borders, while field stones create a rustic look.
Q: How much does it cost to make a rock border?
Answer: Costs vary depending on location and type of stone. Plain river stone borders cost $3-8 per foot, while natural stone borders cost $8-15 per foot.
Q: Can I install a rock border myself?
Answer: Yes! Most stone border projects are suitable for DIY installation. Start with simple methods like stacked stones before trying more complex techniques.
Q: How do I prevent weeds in my rock border?
Answer: Use landscape fabric under the stones and fill the gaps with sand or small gravel. This will prevent weeds from growing between the stones.
Conclusion
Learning how to make a rock border for garden areas is a rewarding project that adds beauty and function to your outdoor space. Whether you choose simple stacked stone or a more complex mortared border, stones provide a long-lasting solution that enhances any garden design. The ten methods outlined in this guide provide options for every skill level and budget. Be sure to choose stones that match your garden style and climate. With proper planning and installation, your stone border will provide beauty for years to come and require minimal maintenance. Start with a small area to practice your technique, then expand your stone border throughout your garden as you gain confidence and experience.
About Ravuk Barg
B.Sc. Horticulture Science | Certified Master Gardener
Ravuk Barg has spent more than a decade with his hands in the soil and his head full of questions about why some gardens thrive while others struggle. What started as a single raised bed of tomatoes and basil in a modest backyard has grown into a deep, working knowledge of everything from seed germination and soil amendment to companion planting and seasonal pruning.
Over the years, Ravuk has gardened through drought summers, waterlogged springs, and pest invasions that would make most gardeners hang up their trowels for good. Those hard seasons, he’ll tell you, taught him more than any perfect growing year ever could. He writes from that earned experience—covering vegetable growing, ornamental planting, houseplant care, composting, and garden design with equal confidence and curiosity.
Philosophy & Approach
Ravuk’s approach to gardening is rooted in practicality. He favors organic methods not out of dogma, but because they work long-term—resulting in healthier soil, fewer inputs, and stronger plants. He has a particular fondness for heirloom vegetable varieties (the kind with proper flavor), unruly cottage-style flower beds, and the stubborn houseplants that everyone else gave up on.
The Mission: Give readers the honest, experience-backed advice that helps them actually succeed in their gardens—not just the ideal version, but the real one; weeds, failures, and all.
Education & Credentials
-
B.Sc. in Horticulture Science
-
Greenfield Agricultural University
-
Focus: Plant Physiology, Soil Ecology, and Sustainable Crop Production
-
-
Master Gardener Certification
-
Cooperative Extension Service
-
Focus: 200+ hours of hands-on practical training and community garden work
-
Continuing Education
-
Organic Pest Management
-
Native Plant Landscaping
-
Sustainable Crop Production