

Creating a stunning garden isn’t just about picking pretty flowers and hoping for the best. The secret lies in understanding how to layer plants in landscaping to create depth, visual interest, and year-round beauty that makes your outdoor space truly spectacular.
Think of your garden like a beautiful painting or a well-designed room. Just as artists use foreground, middle ground, and background elements to create depth, successful landscaping relies on the same principle. Plant layering involves strategically placing different heights, textures, and colors of plants to create a cohesive, natural-looking design.
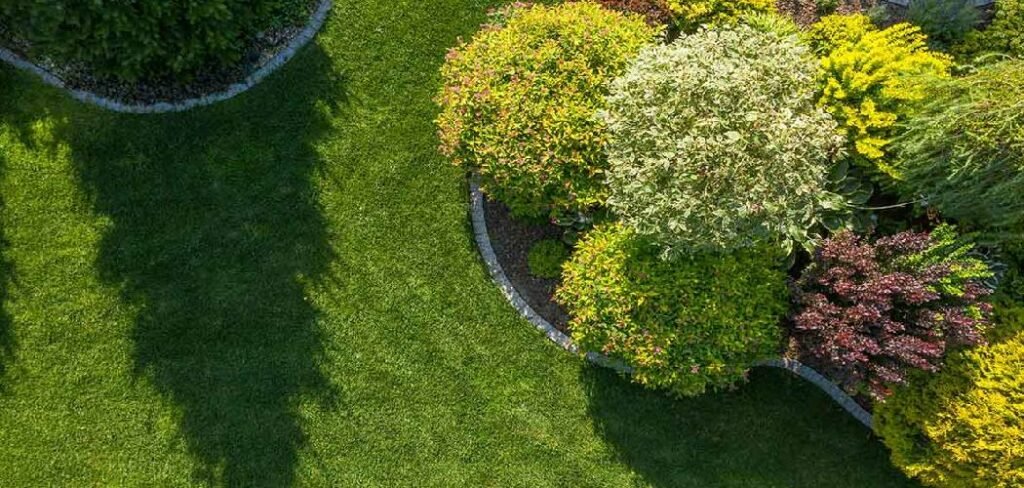
This technique transforms flat, boring yards into dynamic outdoor spaces that capture attention and provide interest throughout the seasons. Whether you’re working with a small suburban plot or expansive acreage, layering creates the foundation for professional-looking results.
By the end of this guide, you’ll understand exactly how to arrange trees, shrubs, perennials, and groundcover to create the garden of your dreams.
Why You Need to Layer Your Plants
Plant layering isn’t just about aesthetics—it’s about creating a functional ecosystem in your yard. Proper layering provides wildlife habitat, improves soil health, and maximizes your growing space.
Layered plantings also solve common landscaping problems. They hide unsightly areas, provide privacy screening, and create microclimates that protect more delicate plants. This approach mimics nature’s own design, where forests naturally develop in distinct layers.
Your maintenance workload decreases too. Strategic plant placement means taller specimens shelter smaller ones, reducing water needs and protecting against harsh weather. The result is a more resilient garden that requires less intervention while looking better than cookie-cutter landscapes.
8 Step-by-Step Guide on How to Layer Plants in Landscaping
Step 1: Assess Your Space and Conditions
Start by thoroughly evaluating your landscape’s unique characteristics. Walk your property at different times of day to understand sun patterns, noting which areas receive full sun, partial shade, or deep shade. Check soil drainage by digging small holes and filling them with water—good drainage means water disappears within a few hours.

Document existing features like mature trees, slopes, or structures that will influence your design. Take photos from various angles to help visualize your future layered garden. Consider your local climate zone and typical weather patterns, as these factors determine which plants will thrive in each layer of your landscape design.
Step 2: Plan Your Canopy Layer
The canopy layer forms your garden’s backbone, consisting of large trees that provide shade and structure. Choose trees based on your space limitations and desired functions—shade trees for cooling, flowering trees for spring beauty, or evergreens for year-round structure.
Consider mature size carefully to avoid future problems. Plant shade trees on your property’s south and west sides to reduce summer cooling costs. Flowering trees work beautifully as focal points, while evergreen specimens provide winter interest and wildlife shelter. Space canopy trees appropriately, allowing each to reach full size without crowding neighboring plants or structures.
Step 3: Design Your Understory Layer
The understory layer bridges the gap between your canopy and smaller plants, typically including small trees and large shrubs ranging from 8 to 25 feet tall. This layer adds mid-level interest and creates natural screening between different garden areas.
Select understory plants that complement your canopy choices and thrive in the light conditions created by overhead trees. Dogwood, redbud, and serviceberry work well in partial shade, while smaller evergreens like holly or juniper provide structure. Consider bloom times to extend your garden’s flowering season, and choose plants with interesting bark or berry production for winter appeal.
Step 4: Select Shrub Layer Plants
Your shrub layer provides the garden’s workhouse plants, handling most of the visual heavy lifting throughout the growing season. These medium-sized plants typically range from 2 to 8 feet tall and include both evergreen and deciduous options for year-round interest.
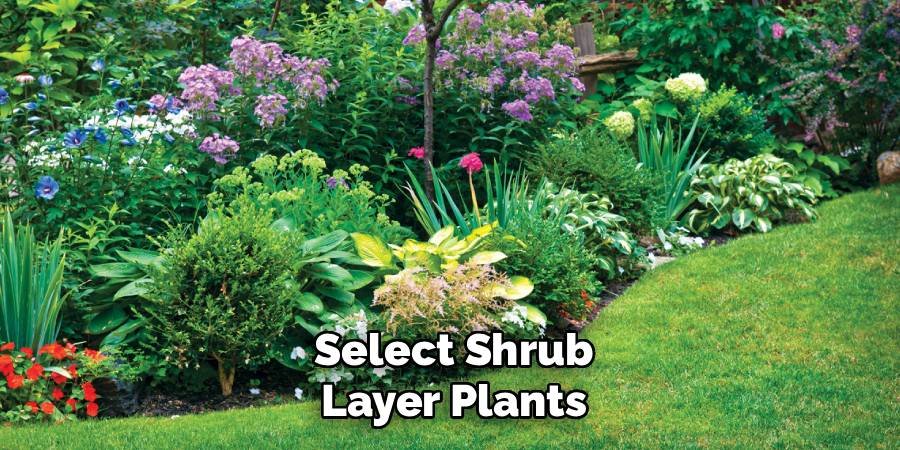
Choose shrubs with different textures, bloom times, and fall colors to create continuous interest. Mix broad-leafed evergreens like rhododendrons with deciduous flowering shrubs like hydrangeas or lilacs. Consider maintenance requirements and mature sizes to prevent overcrowding. Group shrubs in odd numbers for natural-looking arrangements, and repeat certain varieties throughout your design to create unity and flow.
Step 5: Plan Your Perennial Layer
The perennial layer brings color, texture, and seasonal change to your landscape through herbaceous plants that return year after year. This layer typically includes plants from 6 inches to 4 feet tall, creating the garden’s dynamic, ever-changing character.
Design with bloom succession in mind, ensuring flowers appear from early spring through late fall. Combine early bulbs with summer perennials and fall-blooming asters for continuous color. Mix plant heights, textures, and forms—spiky plants like iris beside rounded hostas, or delicate grasses with bold foliage plants. Consider foliage color and texture as important as flowers, since leaves provide interest longer than blooms.
Step 6: Choose Ground Cover Plants
Ground cover forms your landscape’s foundation, suppressing weeds and providing a cohesive base for taller layers. Effective ground covers range from low-growing perennials to spreading shrubs that typically stay under 18 inches tall.

Select ground covers appropriate for each area’s conditions—shade-tolerant options like pachysandra or wild ginger for woodland areas, sun-loving sedums for rocky spots. Some ground covers offer seasonal flowers or colorful foliage as bonus features. Consider maintenance needs, as some ground covers require occasional trimming while others remain naturally compact. Plant in drifts rather than single specimens for maximum impact and weed suppression.
Step 7: Create Transition Zones
Smooth transitions between layers prevent your landscape from looking choppy or disjointed. Overlap plant heights slightly, allowing some understory plants to extend into shrub areas and some shrubs to weave into perennial borders.
Use plants with intermediate sizes to bridge gaps between dramatically different heights. For example, tall ornamental grasses can soften the transition from shrubs to perennials, while small understory trees can ease the jump from large trees to shrub borders. Repeat certain plants or color themes throughout different layers to create visual connections across your entire landscape design.
Step 8: Consider Seasonal Interest
Plan for year-round beauty by including plants that shine in different seasons. Spring might feature flowering trees and bulbs, summer showcases perennial blooms and lush foliage, fall brings colorful leaves and berries, while winter highlights evergreen structure and interesting bark.
Include plants with multiple seasons of interest—trees with spring flowers, summer shade, fall color, and attractive winter bark provide ongoing value. Add evergreen plants throughout all layers to maintain structure when deciduous plants are dormant. Consider how your layered design will look from indoor viewing areas during winter months when you’ll spend more time looking out rather than working in the garden.
Maintaining Your Layered Landscape
Successful maintenance starts with understanding each layer’s specific needs. Canopy trees require the least frequent attention but benefit from annual health inspections and periodic professional pruning to maintain structure and remove damaged branches.
Shrub and perennial layers need more regular attention including seasonal pruning, deadheading spent flowers, and dividing overcrowded clumps every few years. Ground covers typically require the most intensive early maintenance to establish coverage, then minimal care once mature.

Water management becomes easier with proper layering since upper canopy provides natural protection for lower layers. Mulch application helps retain moisture and suppress weeds throughout all levels. Regular observation allows you to catch and address problems before they become serious issues affecting your entire layered design.
Common Mistakes to Avoid
The biggest mistake beginners make is ignoring mature plant sizes and creating overcrowded landscapes that require constant pruning or plant removal. Always research and plan for full-grown dimensions rather than current nursery sizes.
Another frequent error involves choosing plants without considering light requirements as upper layers mature and create more shade. Plants selected for full sun may struggle as canopy trees grow and reduce available light. Similarly, failing to consider bloom times often results in landscapes with short periods of interest followed by long stretches of boring foliage.
Skipping soil preparation and ignoring drainage issues causes ongoing problems regardless of plant selection. Poor soil leads to weak growth, increased pest problems, and higher maintenance requirements across all layers.
Frequently Asked Questions(FAQ)
What’s the Ideal Spacing Between Different Plant Layers?
Allow natural overlap between layers rather than strict separation. Understory plants should extend slightly into shrub areas, and shrubs should weave into perennial spaces for natural, cohesive transitions.
How Long Does It Take for a Layered Landscape to Mature?
Most layered landscapes show good structure within 3-5 years, with full maturity taking 7-10 years. Perennials establish fastest, while canopy trees take longest to reach impressive size.
Can I Create Plant Layers in Small Spaces?
Absolutely! Use dwarf varieties and vertical elements like trellises. Focus on fewer, smaller-scale layers with dwarf trees, compact shrubs, and carefully chosen perennials for maximum impact.
What’s the Best Time to Plant a Layered Landscape?
Fall planting allows root establishment before spring growth, but spring works well too. Avoid extreme weather periods and plant different layers throughout the growing season as conditions permit.
How Do I Fix an Existing Flat Landscape With Layering Principles?
Start by adding canopy elements like trees, then gradually fill in understory and shrub layers over several seasons. Work around existing plants that fit your new design concept.
Conclusion
Learning how to layer plants in landscaping transforms ordinary yards into extraordinary outdoor spaces that provide year-round beauty and functional benefits. This systematic approach creates depth, interest, and ecological value while reducing long-term maintenance requirements.
Your layered landscape will evolve and improve over time as plants mature and fill their designated roles. Start with good planning, choose appropriate plants for each layer, and maintain realistic expectations about establishment time. The investment in thoughtful design pays dividends in increased property value, reduced maintenance, and enhanced outdoor enjoyment.
Remember that successful layering mimics nature’s own design principles. Forests naturally develop these distinct layers, creating stable ecosystems that support diverse wildlife while providing beauty and function. Your home landscape can achieve similar results with proper planning and patience.
Take time to observe how your layered design changes throughout the seasons. The interplay between different heights, textures, and colors creates an ever-changing display that keeps your landscape interesting year-round. Your garden—and local wildlife—will thank you for creating this thoughtfully designed outdoor space.
About Ravuk Barg
B.Sc. Horticulture Science | Certified Master Gardener
Ravuk Barg has spent more than a decade with his hands in the soil and his head full of questions about why some gardens thrive while others struggle. What started as a single raised bed of tomatoes and basil in a modest backyard has grown into a deep, working knowledge of everything from seed germination and soil amendment to companion planting and seasonal pruning.
Over the years, Ravuk has gardened through drought summers, waterlogged springs, and pest invasions that would make most gardeners hang up their trowels for good. Those hard seasons, he’ll tell you, taught him more than any perfect growing year ever could. He writes from that earned experience—covering vegetable growing, ornamental planting, houseplant care, composting, and garden design with equal confidence and curiosity.
Philosophy & Approach
Ravuk’s approach to gardening is rooted in practicality. He favors organic methods not out of dogma, but because they work long-term—resulting in healthier soil, fewer inputs, and stronger plants. He has a particular fondness for heirloom vegetable varieties (the kind with proper flavor), unruly cottage-style flower beds, and the stubborn houseplants that everyone else gave up on.
The Mission: Give readers the honest, experience-backed advice that helps them actually succeed in their gardens—not just the ideal version, but the real one; weeds, failures, and all.
Education & Credentials
-
B.Sc. in Horticulture Science
-
Greenfield Agricultural University
-
Focus: Plant Physiology, Soil Ecology, and Sustainable Crop Production
-
-
Master Gardener Certification
-
Cooperative Extension Service
-
Focus: 200+ hours of hands-on practical training and community garden work
-
Continuing Education
-
Organic Pest Management
-
Native Plant Landscaping
-
Sustainable Crop Production