

A walled garden offers a unique blend of beauty, privacy, and functionality, transforming an ordinary backyard into a secluded paradise. These enchanting spaces, enclosed by walls, have a rich history dating back centuries, providing a sense of sanctuary and a special microclimate for plants to thrive. For beginners, the idea of building one might seem daunting, but it’s a rewarding project that adds immense value and charm to your home.
This guide will walk you through how to create a walled garden, breaking down the process into simple, manageable steps. From planning your layout to selecting the perfect plants, you’ll find everything you need to build your own private outdoor haven.
Why Create a Walled Garden?
Creating a walled garden is about more than just building boundaries; it’s about crafting a purpose-driven, atmospheric space. One of the primary benefits is privacy. The walls provide a physical and visual barrier, shielding you from neighbors and outside noise, creating a true retreat where you can relax and unwind. This enclosure also establishes a unique microclimate.
The walls absorb and radiate heat, which can extend your growing season and allow you to cultivate plants that might not otherwise survive in your region’s climate. They also offer protection from harsh winds, which can damage delicate plants. A walled garden feels intentional and structured, allowing for a more focused and thematic planting design, whether you envision a lush cottage garden, a formal herb garden, or a modern, minimalist courtyard.
10 Step Methods Guide: How to Create a Walled Garden
Step 1: Define Your Vision and Purpose
Before you move a single stone, it’s crucial to define what you want from your walled garden. Is it a quiet space for morning coffee, a productive kitchen garden for growing vegetables and herbs, or a vibrant area for entertaining guests? Your purpose will influence every decision, from the size and materials to the types of plants you choose. Spend time sketching ideas and gathering inspiration from garden magazines or online platforms. Consider the overall style you want to achieve—formal, informal, rustic, or contemporary. This foundational step ensures your final garden is both beautiful and perfectly suited to your lifestyle.

Step 2: Select the Ideal Location and Assess Conditions
Choosing the right spot is essential for a thriving garden. Observe your property at different times of the day to understand the sun and shade patterns. Most plants, especially vegetables and flowering perennials, need at least six hours of direct sunlight. However, a shadier spot can be perfect for a tranquil woodland garden. Also, consider the existing landscape. A naturally level area will be easier and less expensive to work with. Think about access for bringing in materials and proximity to a water source for irrigation. Proper site assessment prevents future struggles and sets your garden up for success.
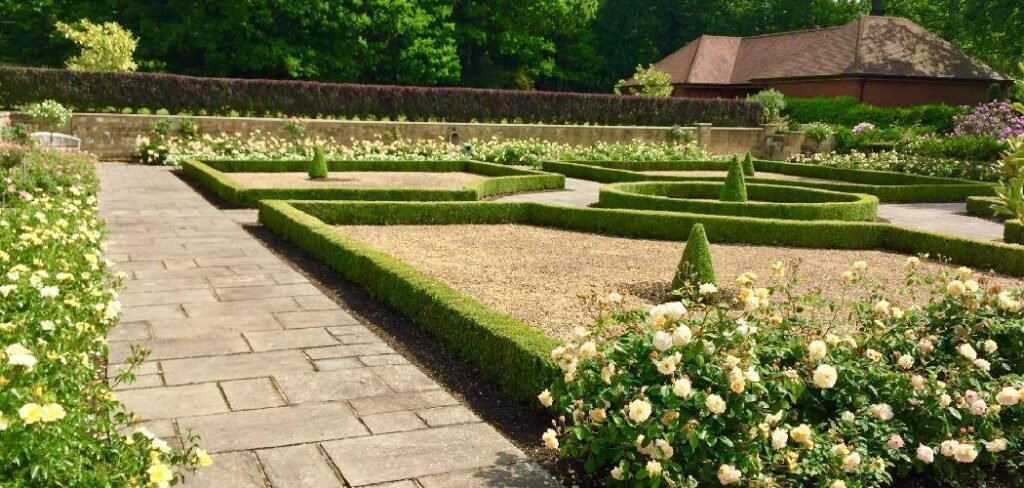
Step 3: Design the Layout and Flow
With a location chosen, you can start designing the layout. Think about the garden’s shape, the placement of entrances, and how you will move through the space. A clear path system not only adds structure but also guides the eye and invites exploration. Will you have a central feature, like a fountain, sculpture, or a specimen tree? Where will you place seating areas to best enjoy the sun or shade? Draw your plan to scale on graph paper, marking out garden beds, pathways, and other key features. This blueprint will be your guide throughout the construction process.
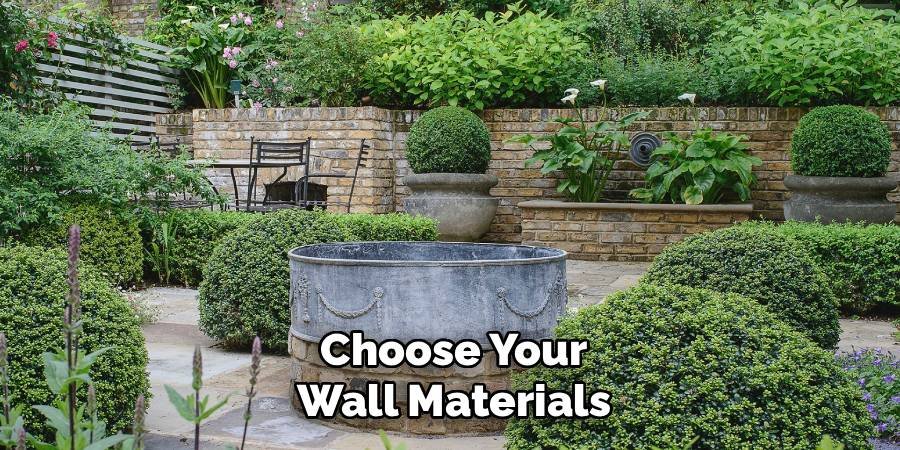
Step 4: Choose Your Wall Materials
The walls are the defining feature of your garden, so choosing the right material is a major decision. Your choice will impact the garden’s aesthetic, budget, and longevity. Traditional options like brick and natural stone offer timeless beauty and excellent durability. Rendered concrete blocks can be a more modern and cost-effective choice, which you can paint to match your desired color scheme. For a rustic look, consider reclaimed wood or even living walls made of dense hedges like yew or boxwood. Ensure your chosen material complies with local building codes, especially regarding wall height.
Step 5: How to Create a Walled Garden Foundation and Build the Walls
Building the walls is the most labor-intensive part of the process. Unless you have significant construction experience, it’s often wise to hire a professional for this stage. Proper footings are critical to prevent the walls from shifting or collapsing over time, especially in areas with frost. The depth and type of foundation will depend on your soil type and the wall’s height and material. A well-built wall is a long-term investment that provides the essential structure and security for your garden, ensuring it stands strong for decades to come.
Step 6: Prepare the Soil and Garden Beds
Once the walls are up, you can turn your attention to what’s inside them: the soil. Healthy soil is the foundation of a healthy garden. Start by removing any weeds, grass, and large rocks from the designated planting areas. Next, amend the soil to improve its structure and fertility. Most garden plants thrive in loamy, well-draining soil. You can enrich your existing soil by adding several inches of organic matter, such as compost, well-rotted manure, or leaf mold, and mixing it into the top 8-12 inches. This will provide essential nutrients and help with water retention.
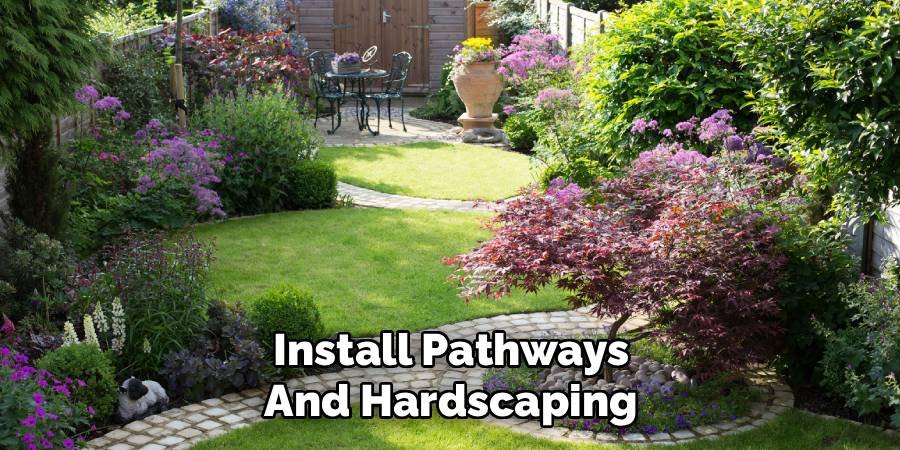
Step 7: Install Pathways and Hardscaping
With the garden beds prepared, it’s time to install your hardscaping elements, such as pathways, patios, and any water features. The materials for these should complement your walls and the overall style of your garden. Gravel or stone pavers create a classic, permeable path, while brick or flagstone can create a more formal look. Laying paths before you plant helps to avoid compacting the freshly prepared soil in your garden beds. This is also the best time to run any necessary irrigation lines or electrical wiring for lighting or a pond pump.
Step 8: Select and Arrange Your Plants
This is the creative step where your walled garden truly comes to life. Refer back to your initial vision and choose plants that fit your theme and are suited to your site’s light conditions. The microclimate of your walled garden may allow you to grow slightly more tender plants than you could elsewhere on your property. Arrange plants by height, with taller ones at the back of the borders. Mix textures, colors, and forms to create visual interest throughout the year. Consider including a mix of evergreen shrubs for winter structure, perennials for seasonal color, and annuals to fill in gaps.
Step 9: Planting and Mulching
Now it’s time to get your plants in the ground. Water them thoroughly in their pots before planting. Dig a hole that is twice as wide as the root ball but no deeper. Gently remove the plant from its container, place it in the hole, and backfill with soil, firming it gently around the base. Once all your plants are in place, water them in well to help them settle. Finally, apply a 2-3 inch layer of organic mulch, like shredded bark or wood chips, around the plants. Mulching is key to retaining soil moisture, suppressing weeds, and regulating soil temperature.
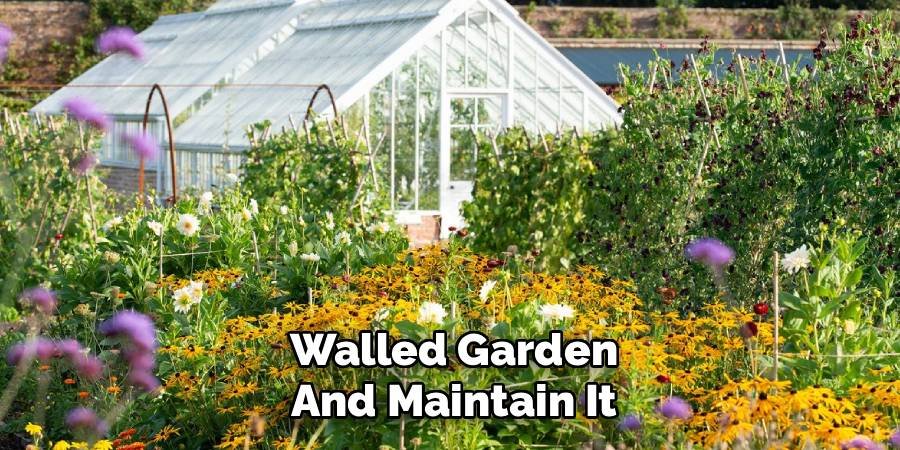
Step 10: How to Create a Walled Garden and Maintain It
Your garden will need ongoing care to look its best. Regular watering is crucial, especially during the first year as plants establish their root systems. Keep an eye out for weeds and remove them before they have a chance to spread. You will also need to prune certain plants to maintain their shape and encourage healthy growth. Fertilize as needed based on your plant choices and soil health. Most importantly, take time to simply be in your garden, observe how it changes through the seasons, and enjoy the beautiful, private sanctuary you have created.
Frequently Asked Questions
What Is the Best Material for a Garden Wall?
The best material depends on your budget, aesthetic preference, and local climate. Brick and natural stone are classic, durable choices that offer a timeless look. Concrete blocks are a more affordable option and can be rendered and painted. Wood can provide a warmer, more rustic feel but requires more maintenance. For a natural approach, a dense, tall hedge like yew or arborvitae can act as a “living wall,” offering greenery and privacy.
How Tall Should a Walled Garden Wall Be?
A height of 6 feet (about 1.8 meters) is generally ideal for creating a sense of enclosure and ensuring privacy without making the space feel too restrictive. However, you should always check your local municipal regulations, as there are often height restrictions for fences and walls, especially those near property lines. A lower wall, around 3-4 feet, can still define a space effectively while keeping it feeling open.
Can I Grow Vegetables in a Walled Garden?
Absolutely! A walled garden can be an excellent place to grow vegetables. The walls can create a warmer microclimate, protecting plants from wind and radiating heat, which can help ripen crops like tomatoes and peppers. Ensure the location you choose receives at least 6-8 hours of direct sunlight per day. Raised beds are a great addition to a walled vegetable garden, as they improve drainage and make tending to your crops easier.

Do I Need a Professional to Build a Walled Garden?
For the wall construction itself, hiring a professional landscaper or mason is highly recommended, especially for walls over 4 feet tall. Building a structurally sound wall requires expertise in laying foundations, ensuring proper drainage, and working with heavy materials. A poorly built wall can be a safety hazard. However, you can certainly handle the design, soil preparation, and planting yourself to save money and be more involved in the creative process.
How Do I Deal With Drainage in a Walled Garden?
Proper drainage is critical to prevent water from pooling and damaging plant roots or the wall’s foundation. When preparing the site, ensure the ground has a slight slope away from any structures. Amending heavy clay soil with organic matter will improve its drainage capacity. For pathways and patios, use permeable materials like gravel or permeable pavers. In areas with very poor drainage, you may need to install a French drain to channel excess water away.
Conclusion
Building a private outdoor retreat is a journey of creativity and rewarding work. By following these steps, you can successfully navigate the process and bring your vision to life. From the initial planning and design to the final selection of plants, each stage is an opportunity to craft a space that is uniquely yours. A well-executed garden of this type provides not just privacy and a favorable growing environment, but a deep sense of peace and connection to nature. We hope this guide has inspired you and given you the confidence to explore how to create a walled garden of your very own.
About Ravuk Barg
B.Sc. Horticulture Science | Certified Master Gardener
Ravuk Barg has spent more than a decade with his hands in the soil and his head full of questions about why some gardens thrive while others struggle. What started as a single raised bed of tomatoes and basil in a modest backyard has grown into a deep, working knowledge of everything from seed germination and soil amendment to companion planting and seasonal pruning.
Over the years, Ravuk has gardened through drought summers, waterlogged springs, and pest invasions that would make most gardeners hang up their trowels for good. Those hard seasons, he’ll tell you, taught him more than any perfect growing year ever could. He writes from that earned experience—covering vegetable growing, ornamental planting, houseplant care, composting, and garden design with equal confidence and curiosity.
Philosophy & Approach
Ravuk’s approach to gardening is rooted in practicality. He favors organic methods not out of dogma, but because they work long-term—resulting in healthier soil, fewer inputs, and stronger plants. He has a particular fondness for heirloom vegetable varieties (the kind with proper flavor), unruly cottage-style flower beds, and the stubborn houseplants that everyone else gave up on.
The Mission: Give readers the honest, experience-backed advice that helps them actually succeed in their gardens—not just the ideal version, but the real one; weeds, failures, and all.
Education & Credentials
-
B.Sc. in Horticulture Science
-
Greenfield Agricultural University
-
Focus: Plant Physiology, Soil Ecology, and Sustainable Crop Production
-
-
Master Gardener Certification
-
Cooperative Extension Service
-
Focus: 200+ hours of hands-on practical training and community garden work
-
Continuing Education
-
Organic Pest Management
-
Native Plant Landscaping
-
Sustainable Crop Production