

A sprawling garden is a beautiful sight, but a tangled garden hose lying across your lawn is not. It’s a tripping hazard, an eyesore, and susceptible to damage from sunlight and lawnmowers.

A simple and effective solution is to hide it just below the surface. Learning how to bury a garden hose underground is a straightforward project that can transform your yard’s look and functionality. This process creates a permanent, hidden watering system that delivers water exactly where you need it without the daily hassle of dragging a heavy hose around. It’s a weekend project that offers long-term convenience and a cleaner, safer garden space for everyone to enjoy.
Why Burying Your Garden Hose is a Game-Changer
Tucking your garden hose out of sight does more than just tidy up your yard. It’s about creating a more efficient and safer environment. An exposed hose is a constant tripping risk for children, pets, and anyone walking across the lawn. It also suffers from direct UV ray exposure, which can degrade the material, causing it to crack and leak over time. By burying the hose, you protect your investment and extend its lifespan significantly. This project also streamlines your watering routine. Instead of wrestling with kinks and knots, you’ll have a direct, unobtrusive water line ready to go, making it easier to maintain a lush, healthy garden.
10 Step-by-Step Guide on How to Bury a Garden Hose Underground
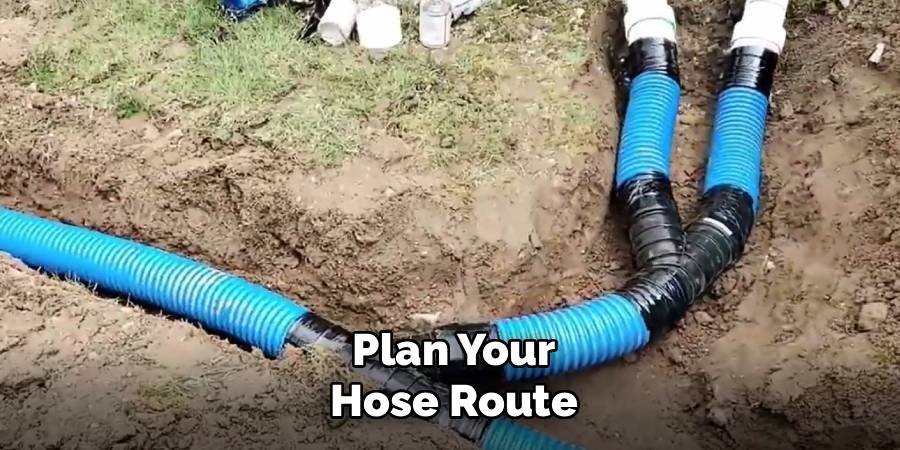
Step 1: Plan Your Hose Route
Before you start digging, take some time to map out the best path for your hose. Your goal is to create the most direct route from your spigot to the primary watering areas, like vegetable patches or flower beds. Use garden stakes or marking flags to visualize the path. Consider any obstacles you might encounter, such as tree roots, sprinkler lines, or underground utility cables. Planning carefully at this stage prevents surprises later and ensures your trenching process is as smooth as possible. A well-thought-out plan will save you time and physical effort.
Step 2: Choose the Right Hose and Fittings
Not all garden hoses are created equal, and for an underground project, durability is key. Select a heavy-duty, high-quality hose that is designed to resist kinking and withstand pressure over time. A 5/8-inch or 3/4-inch diameter hose is typically best for ensuring good water flow. You will also need the right fittings to connect everything. Invest in sturdy brass or high-grade plastic connectors, quick-connect fittings for the endpoints, and potentially a tee-connector if you plan to branch the hose off to multiple locations. Choosing quality materials ensures your underground system remains leak-free and functional for years.
Step 3: Gather Your Tools and Materials
Having all your tools ready will make the job go much faster. You don’t need a lot of specialized equipment for this task. The essentials include a flat-edged spade or a trenching shovel for digging, a utility knife for cutting the hose to the correct length, and work gloves to protect your hands. You’ll also need your chosen hose, fittings, and the marking flags from your planning stage. If you need to run the hose under a walkway, a piece of PVC pipe and a mallet will be useful. Assembling everything in one place means you can work efficiently without constant interruptions.
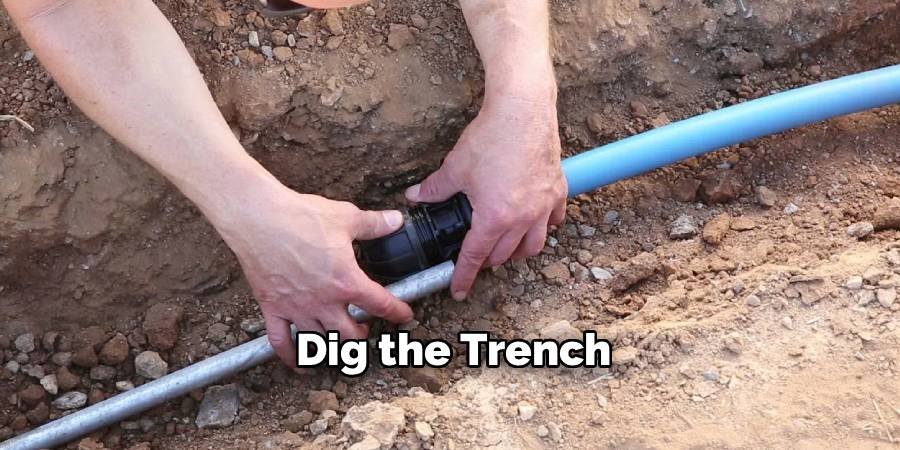
Step 4: Dig the Trench
With your path marked, it’s time to start digging. The goal is a narrow trench that is about 4 to 6 inches deep. This depth is sufficient to protect the hose from lawnmowers and foot traffic without requiring excessive excavation. Use your flat-edged spade to cut straight down along your marked lines, creating clean edges for the trench. Then, use the spade or a trenching shovel to remove the soil between the cuts. Place the excavated soil on a tarp next to the trench to make backfilling easier and keep your lawn clean. Maintain a consistent depth along the entire path.
Step 5: Lay the Garden Hose in the Trench
Once your trench is complete, you can begin laying the hose. Start by connecting one end to your outdoor spigot. Carefully unroll the hose and press it firmly into the bottom of the trench. It’s important to ensure the hose lies flat and is free of any kinks or twists, as these can restrict water flow and cause stress on the material. If your route includes any sharp turns, create gentle, sweeping curves instead of tight 90-degree angles. This practice helps maintain optimal water pressure and prevents the hose from crimping over time.
Step 6: How to Bury a Garden Hose Underground Near Obstacles
Navigating obstacles like sidewalks or driveways might seem tricky, but there’s a simple technique called “boring” to get your hose underneath. First, dig the trench up to both sides of the walkway. Then, use a length of PVC pipe that is slightly wider than your hose. Sharpen one end of the pipe to help it cut through the soil. Place the pipe in the trench and use a mallet or a small sledgehammer to drive it horizontally under the path. Once it emerges on the other side, feed your garden hose through the PVC casing. This protects the hose from compression.
Step 7: Install Risers and Quick-Connects
To access your water at the end of the line, you’ll want to install a riser. A riser is a vertical pipe or hose segment that brings the connection up to ground level. Attach a quick-connect fitting to the end of your buried hose and connect it to a short, flexible hose leader or a permanent stake with a faucet head. This allows you to easily attach a sprinkler or nozzle whenever you need to water. Placing these access points strategically in your garden beds or near your patio makes your watering system incredibly convenient and ready for immediate use.
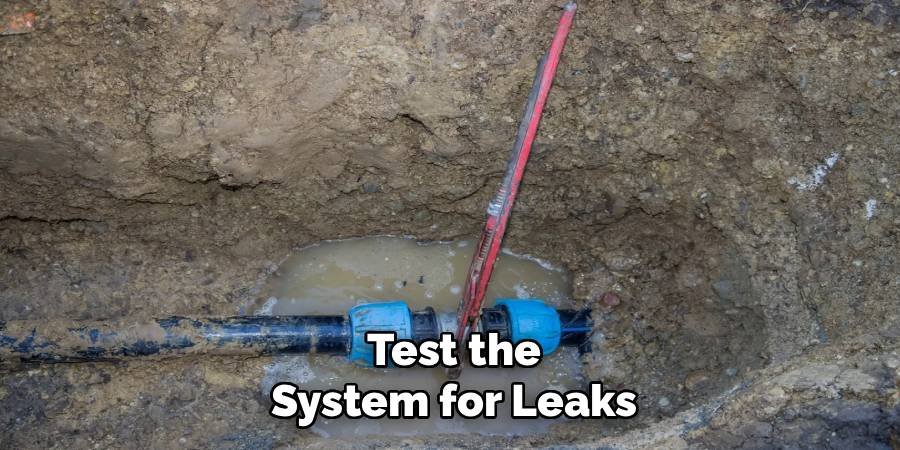
Step 8: Test the System for Leaks
Before you backfill the trench, it’s crucial to test your setup for any leaks. Turn on the water at the spigot and let it run through the entire length of the buried hose. Walk the path and carefully inspect all connection points—at the spigot, at any tee-connectors, and at the final riser. Look for drips, pooling water, or any signs of moisture around the fittings. Tighten any connections that show leakage. This simple check ensures your system is watertight and prevents you from having to dig up the hose later to fix a problem.
Step 9: Backfill the Trench
After confirming there are no leaks, you can fill the trench back in. Use a garden rake or your hands to gently push the soil you set aside on the tarp back into the trench, covering the hose completely. Make sure the soil is evenly distributed. Once the trench is filled, lightly tamp down the soil with your feet or the back of a shovel. This helps remove air pockets and secures the hose in place. Avoid compacting the soil too heavily, as you want to allow for settling and let the grass grow back naturally.
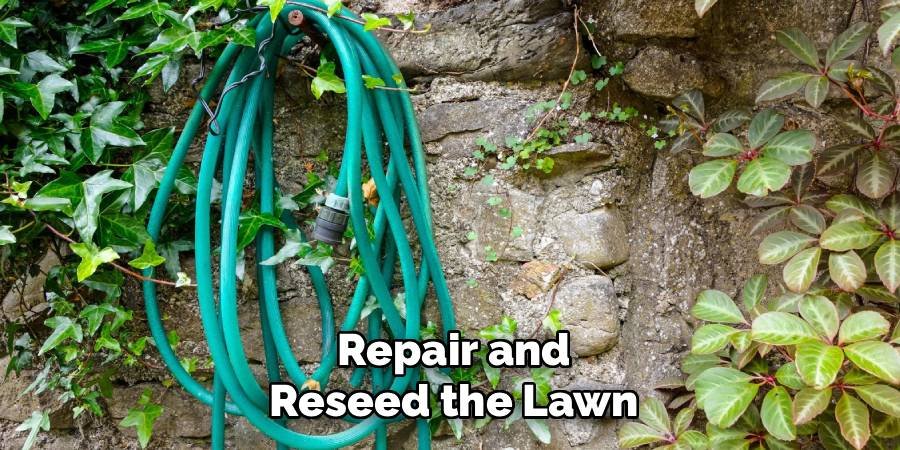
Step 10: Repair and Reseed the Lawn
The final step is to restore your lawn. The narrow trench will have a minimal impact, but you’ll want to encourage the grass to grow back quickly. After backfilling, water the area thoroughly. Rake the surface smooth and spread grass seed over the disturbed soil, using the same type of seed as the rest of your lawn. A light layer of topsoil or compost over the seed will help it germinate. Keep the area consistently moist for the next couple of weeks, and soon the trench line will blend seamlessly into your yard, leaving no trace of your work.
Frequently Asked Questions (FAQ)
How Deep Should I Bury the Hose?
You should aim for a depth of 4 to 6 inches. This is deep enough to protect the hose from lawnmower blades, garden aerators, and everyday foot traffic. It also keeps the hose hidden from view without requiring a massive digging effort. Going much deeper is unnecessary for a simple garden hose and can make future access more difficult. This shallow depth ensures the hose is secure while remaining a manageable DIY project for any homeowner.
Can I Leave a Buried Hose Out in Winter?
It depends on your climate. In areas with hard freezes, it is essential to winterize the system to prevent damage. Water left inside the hose will expand when it freezes, potentially causing the hose to split or burst. To winterize:
- Disconnect the hose from the spigot.
- Use an air compressor to blow all the water out of the line.
- Cap the ends to keep debris and moisture out.
In milder climates where the ground doesn’t freeze solid, you may be able to leave it as is.
What Is the Best Type of Hose for Burying?
The best choice is a high-quality, heavy-duty rubber or reinforced vinyl hose. Look for options labeled as “kink-resistant” or “commercial grade.” A thicker hose, such as a 5/8-inch or 3/4-inch diameter model, will provide better durability and water flow. Avoid lightweight or expandable hoses, as they are not designed to withstand the constant pressure and potential abrasion of being buried underground and will likely fail quickly.
Can I Connect Multiple Hoses Together Underground?
Yes, you can connect multiple hoses to cover a larger area. However, it is critical to use high-quality, leak-proof connectors. Brass fittings are generally more durable than plastic for underground connections. Each connection point is a potential point of failure, so it’s best to use the longest continuous hose possible to minimize joints. If you must connect hoses, ensure the connections are extremely tight and test them thoroughly for leaks before backfilling the trench.
Will Burying the Hose Affect Water Pressure?
Burying the hose itself should not negatively affect water pressure. However, factors like the hose’s length, diameter, and any sharp bends can impact flow. Using a wider diameter hose (e.g., 3/4-inch) over a long distance can help maintain strong pressure. Also, ensuring the path has gradual curves instead of sharp 90-degree turns will prevent crimping and allow water to flow freely. A well-planned and properly installed system should deliver excellent water pressure where you need it.
Conclusion
Creating a hidden watering system is an achievable and rewarding home improvement project. It elevates the look of your outdoor space by eliminating clutter and makes your gardening tasks simpler and more enjoyable. By following these steps, you can confidently take on this project and appreciate the benefits for years to come. Now that you understand how to bury a garden hose underground, you are ready to create a cleaner, safer, and more efficient yard.
About Ravuk Barg
B.Sc. Horticulture Science | Certified Master Gardener
Ravuk Barg has spent more than a decade with his hands in the soil and his head full of questions about why some gardens thrive while others struggle. What started as a single raised bed of tomatoes and basil in a modest backyard has grown into a deep, working knowledge of everything from seed germination and soil amendment to companion planting and seasonal pruning.
Over the years, Ravuk has gardened through drought summers, waterlogged springs, and pest invasions that would make most gardeners hang up their trowels for good. Those hard seasons, he’ll tell you, taught him more than any perfect growing year ever could. He writes from that earned experience—covering vegetable growing, ornamental planting, houseplant care, composting, and garden design with equal confidence and curiosity.
Philosophy & Approach
Ravuk’s approach to gardening is rooted in practicality. He favors organic methods not out of dogma, but because they work long-term—resulting in healthier soil, fewer inputs, and stronger plants. He has a particular fondness for heirloom vegetable varieties (the kind with proper flavor), unruly cottage-style flower beds, and the stubborn houseplants that everyone else gave up on.
The Mission: Give readers the honest, experience-backed advice that helps them actually succeed in their gardens—not just the ideal version, but the real one; weeds, failures, and all.
Education & Credentials
-
B.Sc. in Horticulture Science
-
Greenfield Agricultural University
-
Focus: Plant Physiology, Soil Ecology, and Sustainable Crop Production
-
-
Master Gardener Certification
-
Cooperative Extension Service
-
Focus: 200+ hours of hands-on practical training and community garden work
-
Continuing Education
-
Organic Pest Management
-
Native Plant Landscaping
-
Sustainable Crop Production