

Adding elevation changes to your garden creates visual interest and dimension, but navigating sloped terrain can be a challenge. Garden steps offer a practical and beautiful solution, and using pavers is one of the most accessible methods for a DIY enthusiast. Pavers provide a durable, stable, and attractive pathway that blends seamlessly with your landscape.
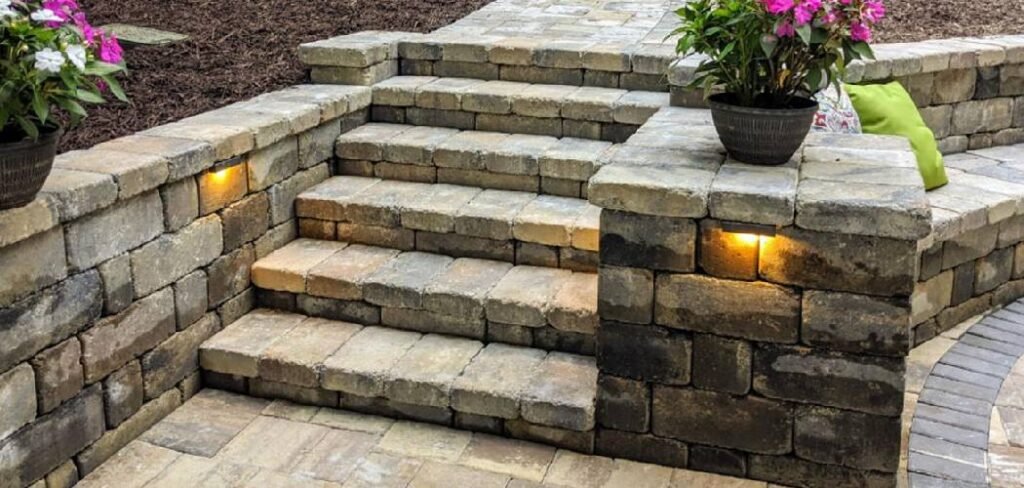
This guide will walk you through everything you need to know about how to build garden steps with pavers, from planning your project to laying the final stone. With the right tools and a bit of patience, you can transform a tricky slope into a stunning garden feature that enhances both the function and beauty of your outdoor space.
Why Build Garden Steps with Pavers?
Choosing the right material for your garden steps is crucial, and pavers offer a unique combination of benefits that make them an excellent choice for any landscape. First, they are incredibly durable and designed to withstand heavy foot traffic and harsh weather conditions, ensuring your steps will last for years with minimal maintenance. Unlike poured concrete, which can crack over time, individual pavers can be easily replaced if one becomes damaged.
7 Step-by-Step Guide on How to Build Garden Steps with Pavers
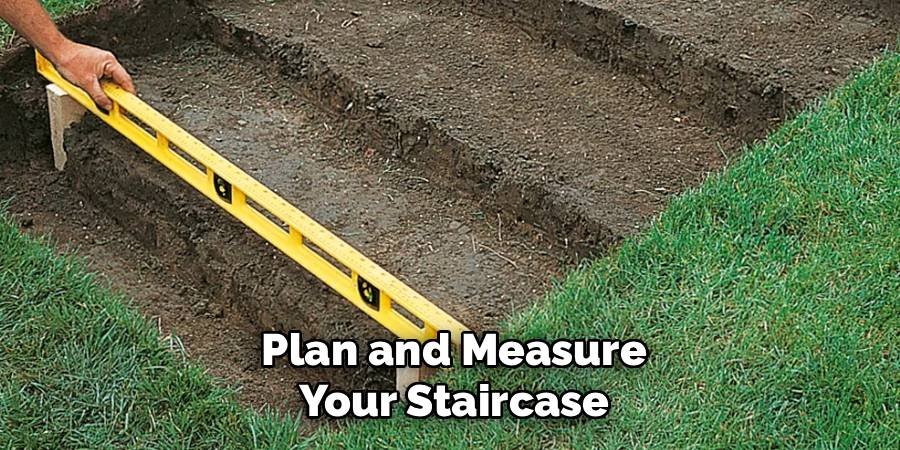
Step 1: Plan and Measure Your Staircase
Before you dig, a solid plan is essential. Start by determining the location and total height (the “rise”) and length (the “run”) of your staircase. Use a tape measure and stakes with string to outline the area. To calculate the number of steps, divide the total rise by the desired height of each step. A comfortable step height is typically between 6 and 7.5 inches. For example, if your slope has a total rise of 30 inches, you would need five steps that are each 6 inches high. This planning stage ensures your steps will be even, comfortable to climb, and structurally sound.
Step 2: Excavate the Slope
Once you have your measurements, it’s time to start digging. Using a shovel, begin excavating the slope to create rough tiers for each step. Remove enough soil to accommodate the base material, sand, and the pavers themselves. The goal is to create a series of flat ledges cut into the hillside. Use a level frequently to ensure each tier is flat from side to side and has a slight downward slope from back to front (about 1/4 inch per foot) to encourage water drainage. This is a labor-intensive step, but creating a solid, level foundation is critical for the stability of your entire staircase.
Step 3: Build a Solid Gravel Base
With the slope excavated, the next step is to build a strong foundation. Add a 4- to 6-inch layer of compactible gravel or crushed stone to each excavated tier. This layer will provide a stable base and promote proper drainage. Spread the gravel evenly with a rake. Then, using a hand tamper, compact the gravel thoroughly until it is firm and level. A properly compacted base prevents the pavers from shifting or sinking over time, which is crucial for safety and longevity. Pay close attention to this step, as a weak base is the most common cause of paver step failure.
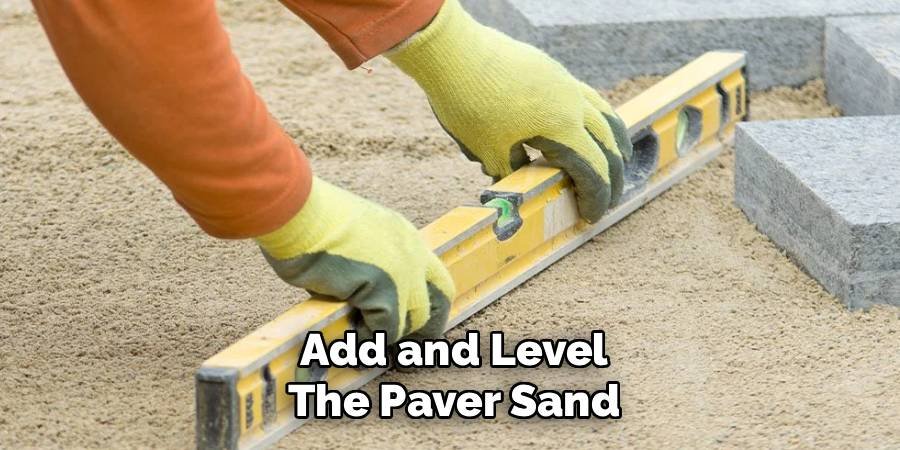
Step 4: Add and Level the Paver Sand
After compacting the gravel, you will add a layer of paver sand. This layer provides a cushion for the pavers and allows for fine-tuning their final height. Spread approximately 1 inch of coarse sand evenly over the compacted gravel base on each step. To level the sand, use a straight board (a 2×4 works well) and drag it across the surface. This process, known as “screeding,” creates a perfectly smooth and flat surface for laying the pavers. Avoid walking on or disturbing the screeded sand, as its consistency is key to achieving a professional-looking finish.
Step 5: How to Build the First Garden Step with Pavers
Start building from the bottom step and work your way up. Place the pavers for the first step’s tread directly onto the screeded sand, fitting them snugly together. Use a rubber mallet to gently tap each paver into place, ensuring it is level with its neighbors. After laying the tread, you will build the riser for the next step. This is often done using interlocking retaining wall blocks placed directly behind the first row of pavers. These blocks will hold back the soil and create the front edge of the step above it.
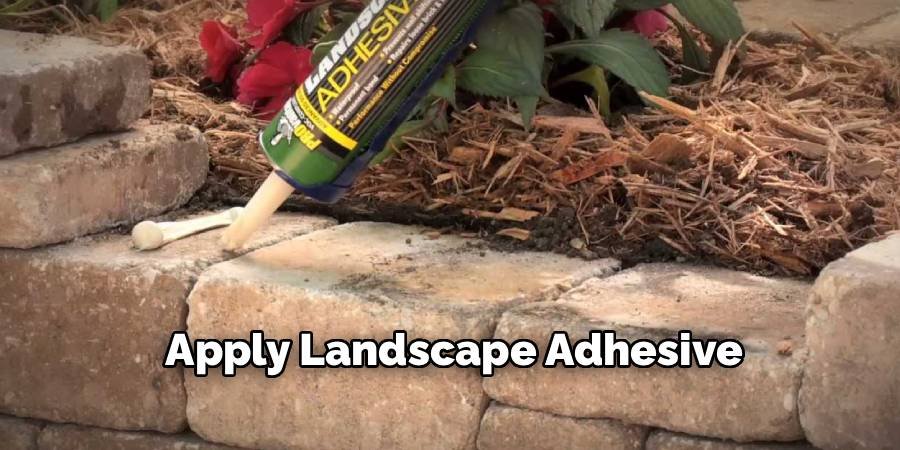
Step 6: Apply Landscape Adhesive
To ensure your steps remain secure, you need to lock the key structural components together. Apply a generous bead of high-strength landscape block adhesive to the top of the riser blocks you just installed. This adhesive will bond the riser blocks to the paver treads that will be placed on top of them for the next step. This is a critical step for stability, as it prevents the paver treads from shifting forward under foot traffic. For the front row of pavers on each tread, apply adhesive underneath to secure them to the step below.
Step 7: How to Continue Building Your Garden Steps with Pavers
With the first step complete and adhesive applied, you can move on to the second step. Backfill the area behind the first riser with compacted gravel and then add and screed your 1-inch layer of sand. Now, lay the pavers for the second tread, ensuring the front edge rests securely on the adhesive-coated riser block from the step below. Use your rubber mallet to tap them into place and check that everything is level. Repeat this process for each subsequent step: build the riser, backfill, add sand, and lay the next tread until you reach the top of the slope.
Lock the Pavers with Polymeric Sand
Once all the pavers are laid, the final step is to lock them together. Sweep polymeric sand across the entire surface of the steps, allowing it to fall into the joints between the pavers. Polymeric sand contains a binding agent that hardens when wet, creating a firm, durable joint that resists weeds and insect infestation. Use a soft-bristled broom to sweep the sand into every crack, then use a leaf blower on a low setting or a broom to remove any excess sand from the paver surfaces. Leaving sand on the pavers can cause a hazy film after watering.
Frequently Asked Questions
What Is the Best Base for Paver Steps?
The best base for paver steps consists of two layers. First, a 4- to 6-inch layer of compacted aggregate gravel provides a stable foundation and excellent drainage. On top of that, a 1-inch layer of coarse paver sand is used. This sand layer creates a smooth, level bed that allows you to set the pavers perfectly. Skipping or skimping on the compacted gravel base is a common mistake that leads to steps shifting, sinking, and becoming uneven over time.
Do You Need to Use Concrete for Paver Steps?
No, you do not necessarily need to use concrete. A “dry-stack” method, which uses a compacted gravel base, sand, and polymeric sand to lock the pavers, is very effective and popular for DIY projects. However, for added stability, especially on very steep slopes or for steps that will see heavy use, you can:
- Set the first course of pavers in a concrete footing.
- Use landscape block adhesive to secure paver treads to riser blocks.
This hybrid approach adds significant strength without the complexity of a full concrete pour.
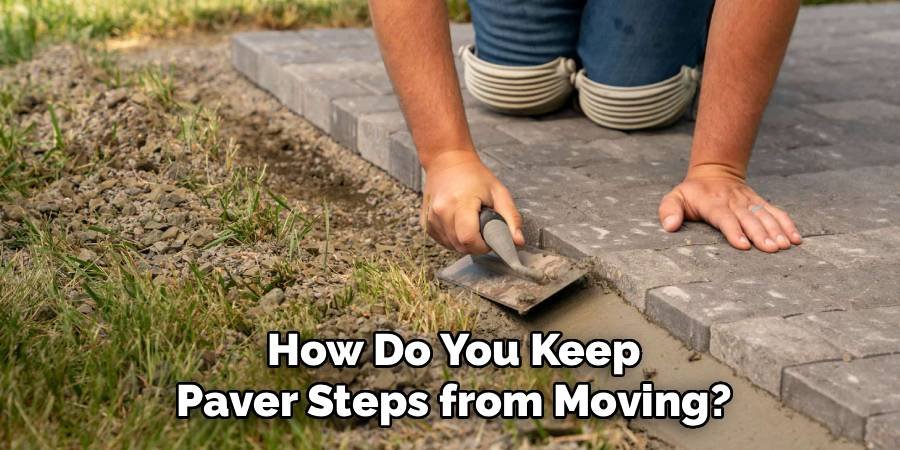
How Do You Keep Paver Steps from Moving?
Preventing movement is all about a solid base and proper installation techniques. The most important factor is the 4- to 6-inch compacted gravel foundation, which prevents sinking. Additionally, using interlocking retaining wall blocks as risers helps hold back the soil. Securing the paver treads to these risers with landscape adhesive is crucial. Finally, sweeping polymeric sand into the joints and activating it locks the individual pavers together horizontally, creating a single, solid unit that resists shifting.
What Is the Ideal Rise and Run for Garden Steps?
For comfortable and safe outdoor steps, a good rule of thumb is a rise (height) of 6 to 7.5 inches per step and a run (depth) of at least 12 inches. A deeper run of 14 to 16 inches can feel more leisurely and provides ample space for your entire foot. It’s more important to keep the rise consistent for every step to avoid creating a tripping hazard. Before you start, measure your total slope height and divide it by your desired rise to determine the exact number of steps you will need.
Can You Build Paver Steps on a Steep Slope?
Yes, you can build paver steps on a steep slope, but it requires extra planning and reinforcement. On steep inclines, you may need to create deeper excavations and use more robust retaining wall blocks for the risers to properly hold back the soil pressure. It is also highly recommended to use landscape adhesive to glue each layer of pavers and blocks together. For very steep or long staircases, incorporating landings (flat areas between sections of stairs) can break up the climb and add structural stability.
Conclusion
Building a set of garden steps is a rewarding project that can dramatically improve your landscape’s functionality and curb appeal. By following these steps—from careful planning and excavation to properly laying and securing the stones—you can create a durable and beautiful staircase. The process requires patience and physical effort, but the results are well worth it. Now that you have a clear roadmap on how to build garden steps with pavers, you are ready to tackle that slope and add a professional-looking feature to your outdoor living space.
About Ravuk Barg
B.Sc. Horticulture Science | Certified Master Gardener
Ravuk Barg has spent more than a decade with his hands in the soil and his head full of questions about why some gardens thrive while others struggle. What started as a single raised bed of tomatoes and basil in a modest backyard has grown into a deep, working knowledge of everything from seed germination and soil amendment to companion planting and seasonal pruning.
Over the years, Ravuk has gardened through drought summers, waterlogged springs, and pest invasions that would make most gardeners hang up their trowels for good. Those hard seasons, he’ll tell you, taught him more than any perfect growing year ever could. He writes from that earned experience—covering vegetable growing, ornamental planting, houseplant care, composting, and garden design with equal confidence and curiosity.
Philosophy & Approach
Ravuk’s approach to gardening is rooted in practicality. He favors organic methods not out of dogma, but because they work long-term—resulting in healthier soil, fewer inputs, and stronger plants. He has a particular fondness for heirloom vegetable varieties (the kind with proper flavor), unruly cottage-style flower beds, and the stubborn houseplants that everyone else gave up on.
The Mission: Give readers the honest, experience-backed advice that helps them actually succeed in their gardens—not just the ideal version, but the real one; weeds, failures, and all.
Education & Credentials
-
B.Sc. in Horticulture Science
-
Greenfield Agricultural University
-
Focus: Plant Physiology, Soil Ecology, and Sustainable Crop Production
-
-
Master Gardener Certification
-
Cooperative Extension Service
-
Focus: 200+ hours of hands-on practical training and community garden work
-
Continuing Education
-
Organic Pest Management
-
Native Plant Landscaping
-
Sustainable Crop Production