

How to make a raised garden bed cover with hinges is one of the best ways to protect your plants. This simple project helps keep pests away and makes garden care much easier. A hinged cover allows you to quickly open and close your garden bed. You can water plants, pull weeds, and harvest vegetables without having to remove the entire cover.
Many gardeners struggle to protect their crops from animals and the weather. A raised garden bed cover with hinges solves these problems perfectly. The hinges make it easy to access your plants and keep them safe when you are not around.
Why You Need a Raised Garden Bed Cover with Hinges
Garden covers protect your plants in many ways. They keep rabbits, deer, and birds from eating your vegetables. These covers also help during bad weather, such as strong winds or hail.
Hinged covers are better than regular covers because they are easier to use. You don’t have to lift or store heavy items. Flip the hinged parts open while working in your garden. A good garden bed cover helps plants grow better. It can create a small greenhouse effect that keeps the plants warm. This means you can grow vegetables in early spring and late fall.
Materials Needed for Your Garden Bed Cover
Before you start building, gather all your materials. Here’s what you’ll need:
Wood Materials:
- 2×2-inch cedar or pine boards (8 pieces, 8 feet long)
- 1×2-inch wood strips (4 pieces, 8 feet long)
- Wood screws (2.5 inches long)
- Wood screws (1.25 inches long)
Hardware:
- Heavy-duty hinges (4 pieces)
- Door handles or knobs (2 pieces)
- Galvanized screws for hinges
- Corner brackets (8 pieces)
Covering Material:
- Hardware cloth or chicken wire
- Clear polycarbonate panels (optional)
- Garden fabric or row cover material
- Staple gun and staples
Tools Required:
- Drill with bits
- Saw (hand saw or circular saw)
- Measuring tape
- A pencil for marking
- Level
- Screwdriver
- Wire cutters
- Safety glasses
8 Step-by-Step Guide on How to Make a Raised Garden Bed Cover with Hinges
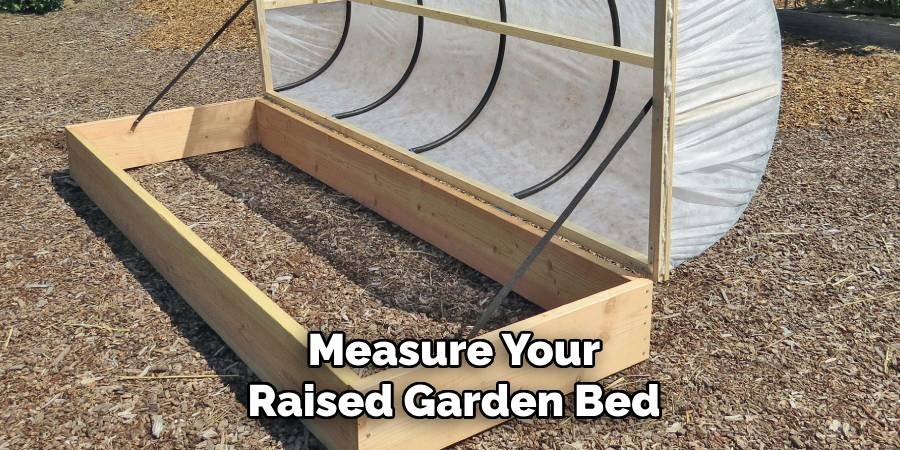
Step 1: Measure Your Raised Garden Bed
Start by carefully measuring your raised garden bed. Write down the length, width, and height. Most raised beds are 4 feet wide and 8 feet tall, but your bed may be different. Add 2 inches to each measurement. This extra space ensures that your cover fits properly over the edge of the bed. The cover should fit snugly on top, not too tight or too loose. Check that your garden bed is level and square. If it is not level, your cover will not fit properly. Use a level tool to check all sides of your raised bed.
Step 2: Cut the Wood Frame Pieces
Cut your 2×2 boards to make the frame. You’ll need pieces for the top and sides of your cover. For a 4×8-foot garden bed, cut:
- 4 pieces at 52 inches (top frame length)
- 4 pieces at 28 inches (top frame width)
- 4 pieces at 12 inches (side supports)
Cut the 1×2 strips into smaller pieces for extra support. These will help hold the covering material in place. Sand the cut edges smooth to prevent splinters. Rough edges can tear your covering material or hurt your hands.
Step 3: Build the Two-Frame Sections
Your cover will have two parts that are connected by hinges. This makes it easier to open and gives you better access to your plants. Make each frame piece into a rectangle. Make two frames using the 52-inch and 28-inch pieces. Attach the corners with wood screws and corner brackets for extra strength. Make sure each frame is perfectly square. Measure the diagonal corners – they should be the same length. This step is very important for a well-fitting cover.
Step 4: Add the Side Supports
Attach the 12-inch side pieces to form a box shape for your frames. These pieces will be the edges of your raised garden bed. Screw the side pieces into the inside of each frame. Make sure they are the same height so that your cover sits evenly on the garden bed. Check that both frame parts fit onto your raised bed. They should fit tightly without wobbles or gaps.
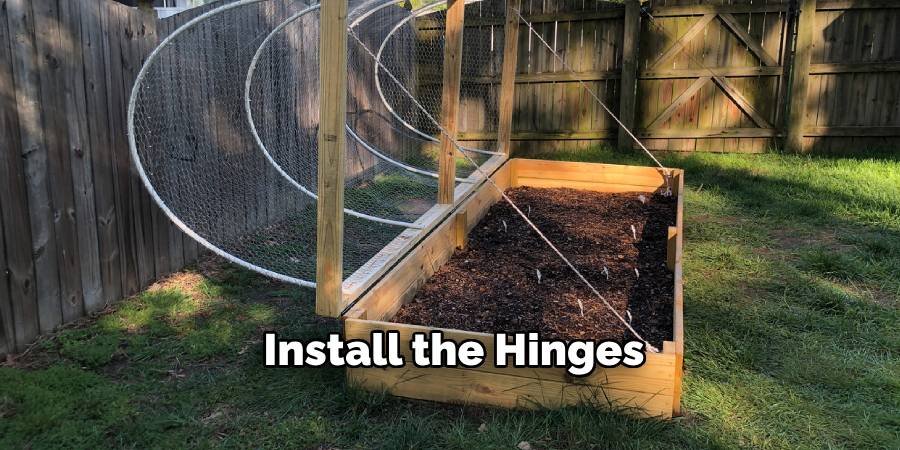
Step 5: Install the Hinges
Choose where to place your hinges on the frame. Usually, the best place is in the middle where the two halves meet. This creates a good balance when opening and closing. Mark the locations of the hinges with a pencil. Use a drill to make pilot holes for the hinge screws. This will prevent the wood from splitting. Attach the hinges to both parts of the frame. Make sure they are perfectly aligned so that the cover opens and closes smoothly. Test the movement several times before moving on to the next step.
Step 6: Attach Your Covering Material
Now it’s time to add the ingredients to protect your plants. You have several choices depending on what you want to achieve. To keep out insects, use hardware cloth or chicken wire. Stretch it tightly across each frame section and staple it every 6 inches. Make sure there are no loose spaces where small animals can get in. If you also want weather protection, add transparent polycarbonate panels over the wire. These create a greenhouse effect as well as letting in light.
To extend the season, use garden fabric or row cover material. This allows air and water to pass through and protects against frost and insects.
Step 7: Add Handles and Final Hardware
Add a handle or knob to the front edge of each cover. This will make it much easier to lift and open your garden bed cover. Choose a handle that is comfortable to hold and won’t break in the elements. Galvanized or stainless steel hardware works best for outdoor projects. Add additional support strips if needed. 1×2 strips can go between the larger sections of the frame to prevent sagging.
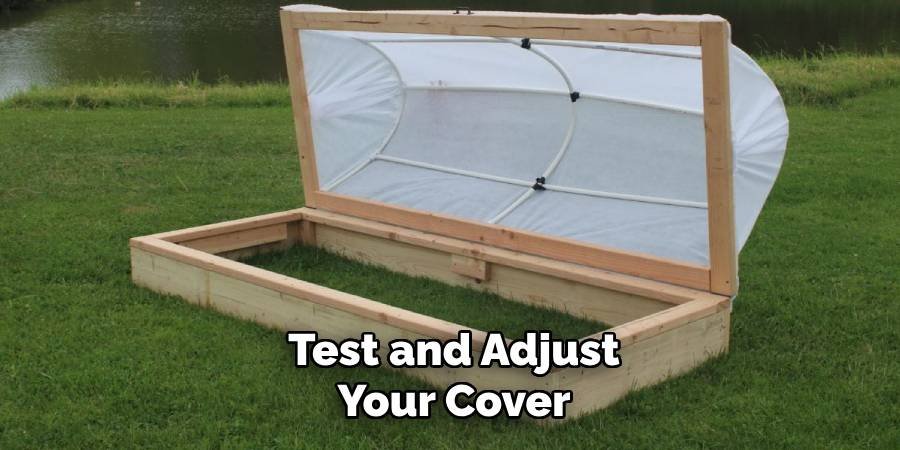
Step 8: Test and Adjust Your Cover
Place your finished cover on the raised garden bed and test how it works. Both parts should open easily without sticking or binding. Check that the cover is sitting evenly and not rocking back and forth. If it is, you may need to adjust the side supports or check that your garden bed is level. Make sure the hinges work smoothly and the cover stays open whenever you want it to. Heavy covers may need a support stick to keep them open while you work.
Common Mistakes to Avoid
Many people make the same mistakes when making garden bed covers. Here’s how to avoid them: Don’t skip measuring twice before cutting. Incorrect measurements waste materials and time. Always double-check your numbers. Do not use screws that are too long or too short. Long screws can tear or puncture the wood. Short screws do not hold well. Be sure to pre-drill holes for the screws near the edges of the board. This will prevent the wood from splitting. Do not place hinges too close to corners. They require sturdy wood to install, and corner areas are often weak. Do not make the cover too heavy. You will get tired lifting it, and the hinges may be damaged over time.
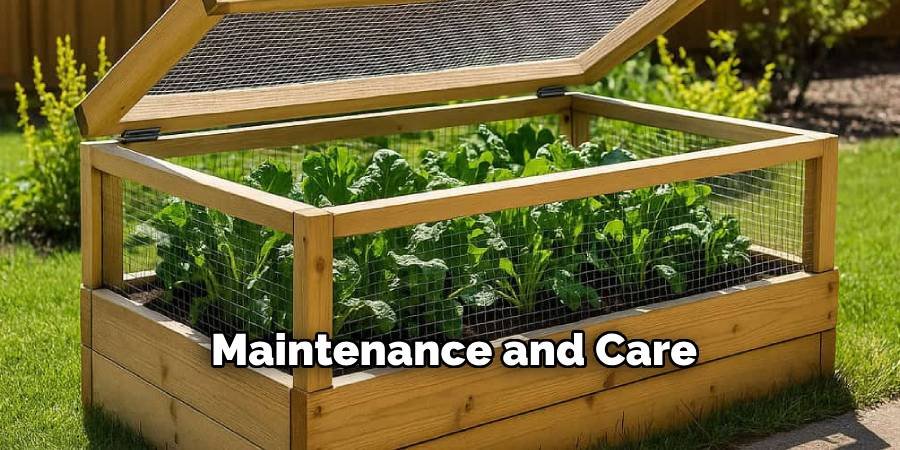
Maintenance and Care
Your raised garden cover, including the hinges, will last a long time with proper care. Check the hinges every few months and oil them if they start to squeak or stick. Check for loose screws and tighten as needed. Weather changes can cause wood to expand and contract, which can loosen hardware. Replace covering materials if they are damaged or worn. Small holes can allow insects to enter, so repair them quickly. Clean dirt and debris from the hinges so they can operate smoothly. A small brush works well for this task. Store the cover properly when you remove it for the winter. Keep it in a dry place where it will not be deformed or damaged.
Seasonal Uses for Your Garden Cover
Your raised garden bed cover works great all year round. In the spring, it protects seedlings from late frosts and hungry animals. Summer uses include protecting crops from intense heat and severe storms. This cover can also keep birds away from ripe berries and vegetables. Fall is perfect for the growing season. Close the cover on cold nights to retain heat and keep tender plants growing longer. Winter covers protect perennial plants and prevent soil erosion. They keep garden beds clean and ready for next year’s planting.
Conclusion
Learning how to make a raised garden bed cover with hinges is a valuable skill for any gardener. This project protects your plants and makes garden care much easier. The hinged design gives you quick access to your crops without having to remove the entire cover. Making your cover saves money and allows you to customize it to your specific needs. With basic tools and materials, you can create a strong cover that will last for years.
The step-by-step process is easy enough for beginners but delivers professional results. Making your cover saves money and allows you to customize it to your specific needs. With basic tools and materials, you can create a strong cover that will last for years. The step-by-step process is easy enough for beginners but delivers professional results.
About Ravuk Barg
B.Sc. Horticulture Science | Certified Master Gardener
Ravuk Barg has spent more than a decade with his hands in the soil and his head full of questions about why some gardens thrive while others struggle. What started as a single raised bed of tomatoes and basil in a modest backyard has grown into a deep, working knowledge of everything from seed germination and soil amendment to companion planting and seasonal pruning.
Over the years, Ravuk has gardened through drought summers, waterlogged springs, and pest invasions that would make most gardeners hang up their trowels for good. Those hard seasons, he’ll tell you, taught him more than any perfect growing year ever could. He writes from that earned experience—covering vegetable growing, ornamental planting, houseplant care, composting, and garden design with equal confidence and curiosity.
Philosophy & Approach
Ravuk’s approach to gardening is rooted in practicality. He favors organic methods not out of dogma, but because they work long-term—resulting in healthier soil, fewer inputs, and stronger plants. He has a particular fondness for heirloom vegetable varieties (the kind with proper flavor), unruly cottage-style flower beds, and the stubborn houseplants that everyone else gave up on.
The Mission: Give readers the honest, experience-backed advice that helps them actually succeed in their gardens—not just the ideal version, but the real one; weeds, failures, and all.
Education & Credentials
-
B.Sc. in Horticulture Science
-
Greenfield Agricultural University
-
Focus: Plant Physiology, Soil Ecology, and Sustainable Crop Production
-
-
Master Gardener Certification
-
Cooperative Extension Service
-
Focus: 200+ hours of hands-on practical training and community garden work
-
Continuing Education
-
Organic Pest Management
-
Native Plant Landscaping
-
Sustainable Crop Production