

Does your lawn look brown, patchy, or full of weeds? Don’t worry! Many homeowners face the same problem. An ugly lawn can make your whole house look bad. But the good news is that you can fix it yourself. This guide will show you exactly how to fix an ugly lawn in 8 simple steps.

A beautiful lawn doesn’t happen overnight. It takes time, effort, and the right steps. But when you follow these methods, you’ll see amazing results. Your lawn will become the pride of your neighborhood.
Why Do Lawns Become Ugly?
Before we learn how to fix an ugly lawn, let’s understand why lawns get ugly in the first place. Common problems include:
- Poor soil quality
- Not enough water
- Too much or too little sunlight
- Diseases and pests
- Heavy foot traffic
- Wrong type of grass for your area
- Lack of proper fertilization
- Compacted soil
Understanding these problems helps you fix them better. Now, let’s dive into our 8-step process to transform your ugly lawn.
8 Step by Step Guide on How to Fix an Ugly Lawn
Step 1: Test Your Soil Quality
The first step to fix an ugly lawn is testing your soil. Your grass needs good soil to grow healthy and strong. Bad soil is often the main reason why lawns look ugly. You can buy a soil test kit from any garden store. These kits are cheap and easy to use. The test will tell you about your soil’s pH level and nutrients. Most grass types like soil with a pH between 6.0 and 7.0.
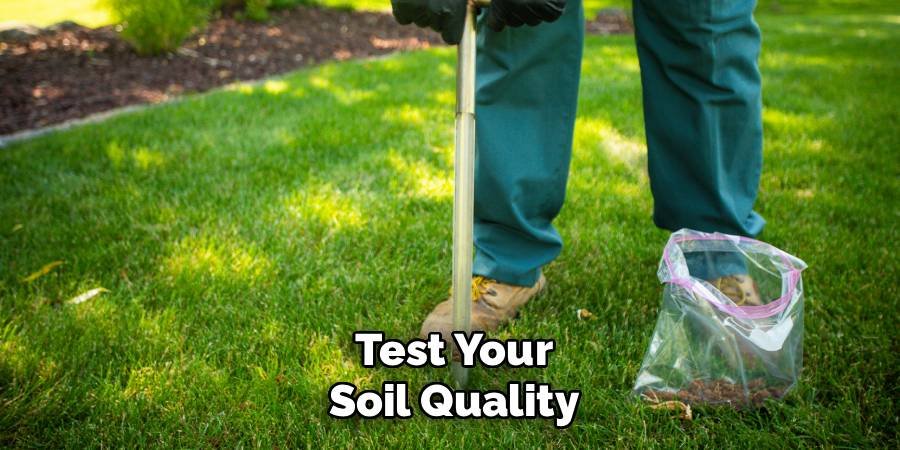
If your soil is too acidic (below 6.0), add lime to make it better. If it’s too basic (above 7.0), add sulfur. This simple step can make a huge difference in how your lawn looks. Also check if your soil has enough nutrients like nitrogen, phosphorus, and potassium. These are the main foods that grass needs to stay green and healthy.
Step 2: Remove Weeds and Dead Grass
Next, you need to clean up your lawn. Remove all the weeds, dead grass, and debris. This gives your new grass the best chance to grow. For small areas, you can pull weeds by hand. Make sure to get the roots out too. For larger areas, use a weed killer that’s safe for grass. Read the label carefully and follow the directions.
After removing weeds, rake up all the dead grass and leaves. This process is called dethatching. Dead grass can stop new grass from growing properly. If your lawn has bare spots, mark them. You’ll need to plant new grass seeds in these areas later.
Step 3: Aerate Your Lawn
Soil compaction is a big problem for ugly lawns. When soil gets too packed down, grass roots can’t breathe or get water. This makes grass look weak and yellow. Aeration means making small holes in your soil. You can rent an aerator machine or buy a simple hand aerator. The best time to aerate is during your grass’s growing season.
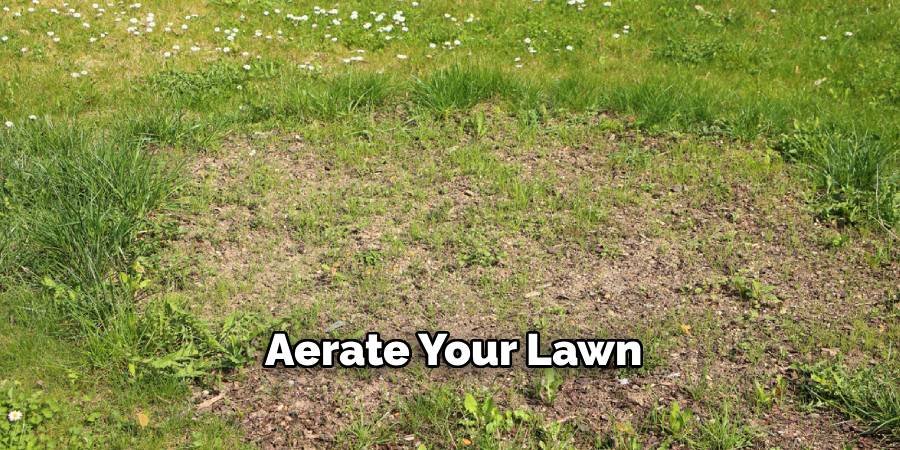
Walk slowly across your lawn with the aerator. Make holes about 2-3 inches deep and 4-6 inches apart. This lets air, water, and nutrients reach the grass roots better. After aerating, your lawn might look messy for a few days. Don’t worry – this is normal and will help your grass grow much better.
Step 4: Add Quality Topsoil and Compost
Good soil is the foundation of a beautiful lawn. After aerating, add a thin layer of quality topsoil mixed with compost. Compost adds nutrients to your soil and helps it hold water better. You can make your own compost or buy it from a garden center. Spread about half an inch of this mixture over your entire lawn.
Use a rake to spread the soil mixture evenly. Don’t add too much – a thin layer is perfect. Too much soil can actually hurt your existing grass. This step gives your grass the nutrients it needs to grow thick and green. It also helps new grass seeds grow better in the next steps.
Step 5: Choose the Right Grass Seed
Not all grass types work well in every area. To fix an ugly lawn, you need to choose grass that grows well in your climate and soil. Cool-season grasses like fescue and bluegrass work best in northern areas. Warm-season grasses like Bermuda and Zoysia are better for southern regions.
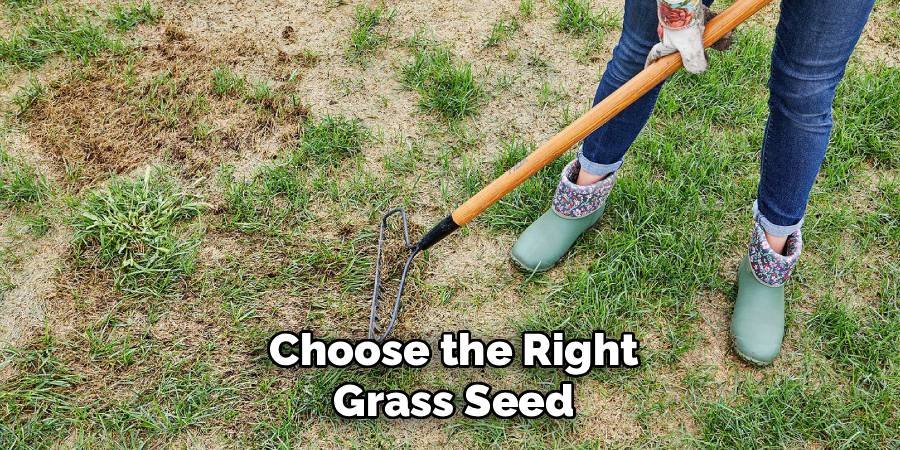
Consider how much sunlight your lawn gets. Some grass types need full sun, while others can handle shade. Also think about how much foot traffic your lawn gets. Ask your local garden center what grass works best in your area. They know your local climate and soil conditions. Buying the right seed is very important for fixing your ugly lawn.
Step 6: Plant Grass Seeds Properly
Now comes the exciting part – planting new grass! This step is crucial for transforming your ugly lawn into something beautiful. Spread grass seeds evenly across your lawn using a seed spreader. Follow the directions on the seed package for how much to use. Too many seeds can actually hurt growth, so don’t use too much.
After spreading seeds, lightly rake the soil to cover them. Seeds should be buried about 1/4 inch deep. Then gently water the area to help seeds start growing. For bare spots, you might need to add extra seeds. Make sure these areas get plenty of water and protection from foot traffic.
Step 7: Water Consistently and Correctly
Proper watering is key to fixing an ugly lawn. New grass seeds need water every day until they start growing. After that, deep watering 2-3 times per week works better than daily light watering. Water early in the morning when it’s cool. This gives grass time to absorb water before the hot sun comes out. Evening watering can cause disease problems.
Check your sprinklers to make sure they cover your entire lawn evenly. Dry spots will stay ugly even after all your hard work. Most lawns need about 1 inch of water per week, including rainfall. You can measure this by placing empty cans around your lawn while watering.
Step 8: Fertilize and Maintain Regularly
The final step to fix an ugly lawn is ongoing care. Even the best lawn needs regular feeding and maintenance. Fertilize your lawn according to your grass type and season. Most lawns need fertilizer 2-4 times per year. Spring and fall are usually the best times.
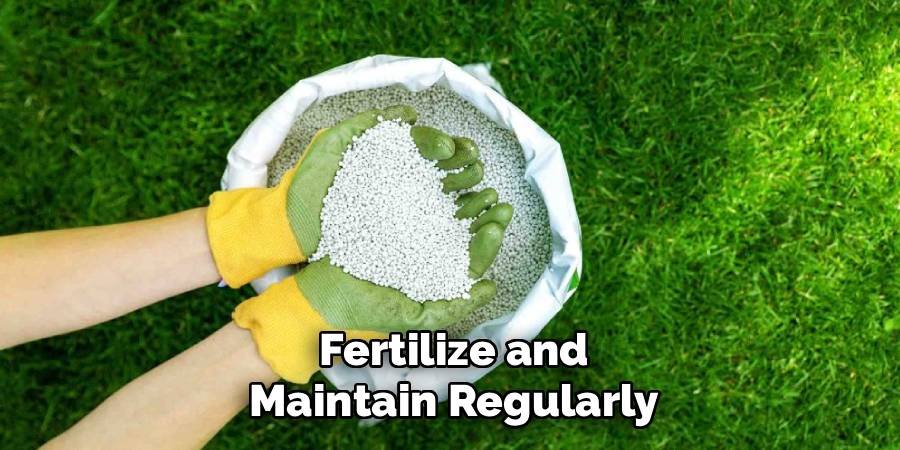
Mow your grass regularly, but never cut more than one-third of the blade length at once. Sharp mower blades make clean cuts that help grass stay healthy. Keep watching for weeds and treat them quickly. It’s much easier to stop weeds when they’re small than after they spread.
Frequently Asked Questions (FAQs)
1. How long does it take to fix an ugly lawn?
It usually takes 4-6 weeks to see new grass growing, but a completely transformed lawn can take 3-6 months. The exact time depends on your grass type, weather, and how badly damaged your lawn was. Be patient – good results take time!
2. What’s the best time of year to fix an ugly lawn?
The best time depends on your grass type. For cool-season grasses, early fall or spring works best. For warm-season grasses, late spring or early summer is ideal. Avoid the hottest summer months when possible.
3. How much does it cost to fix an ugly lawn?
Costs vary depending on your lawn size and problems. DIY lawn repair typically costs $200-800 for an average yard. This includes soil test, seeds, fertilizer, and tools. Professional help costs more but saves time and effort.
4. Can I fix my lawn without removing all the old grass?
Yes, you can often overseed existing grass without removing it all. However, if more than 50% of your lawn is dead or diseased, starting over might give better results. Assess your lawn’s condition first.
5. Why does my grass keep dying after I fix it?
Common reasons include overwatering, underwatering, poor soil drainage, disease, or using the wrong grass type for your area. Make sure you’re following proper care instructions and consider getting a soil test to identify hidden problems.
Conclusion
Learning how to fix an ugly lawn takes effort, but the results are worth it. By following these 8 simple steps – testing soil, removing weeds, aerating, adding topsoil, choosing right seeds, planting properly, watering correctly, and maintaining regularly – you can transform any ugly lawn into a beautiful green space. Remember, fixing an ugly lawn doesn’t happen overnight. It takes patience and consistent care. But when you see your neighbors admiring your beautiful grass, you’ll know all your hard work paid off.
Start with soil testing and work through each step carefully. Don’t skip steps or rush the process. Your lawn is an investment in your home’s beauty and value. With proper care and these proven methods, your ugly lawn will become the envy of the neighborhood. Take before and after photos to see your amazing progress. Soon, you’ll have the gorgeous green lawn you’ve always wanted.
About Ravuk Barg
B.Sc. Horticulture Science | Certified Master Gardener
Ravuk Barg has spent more than a decade with his hands in the soil and his head full of questions about why some gardens thrive while others struggle. What started as a single raised bed of tomatoes and basil in a modest backyard has grown into a deep, working knowledge of everything from seed germination and soil amendment to companion planting and seasonal pruning.
Over the years, Ravuk has gardened through drought summers, waterlogged springs, and pest invasions that would make most gardeners hang up their trowels for good. Those hard seasons, he’ll tell you, taught him more than any perfect growing year ever could. He writes from that earned experience—covering vegetable growing, ornamental planting, houseplant care, composting, and garden design with equal confidence and curiosity.
Philosophy & Approach
Ravuk’s approach to gardening is rooted in practicality. He favors organic methods not out of dogma, but because they work long-term—resulting in healthier soil, fewer inputs, and stronger plants. He has a particular fondness for heirloom vegetable varieties (the kind with proper flavor), unruly cottage-style flower beds, and the stubborn houseplants that everyone else gave up on.
The Mission: Give readers the honest, experience-backed advice that helps them actually succeed in their gardens—not just the ideal version, but the real one; weeds, failures, and all.
Education & Credentials
-
B.Sc. in Horticulture Science
-
Greenfield Agricultural University
-
Focus: Plant Physiology, Soil Ecology, and Sustainable Crop Production
-
-
Master Gardener Certification
-
Cooperative Extension Service
-
Focus: 200+ hours of hands-on practical training and community garden work
-
Continuing Education
-
Organic Pest Management
-
Native Plant Landscaping
-
Sustainable Crop Production