

Creating a vertical garden is one of the most rewarding ways to enhance your home’s exterior or interior. A living wall adds vibrant color, texture, and a sense of tranquility to any environment. Whether you want to cover an unsightly fence, increase your privacy from neighbors, or simply enjoy the beauty of nature in a small footprint, this project is the perfect solution.
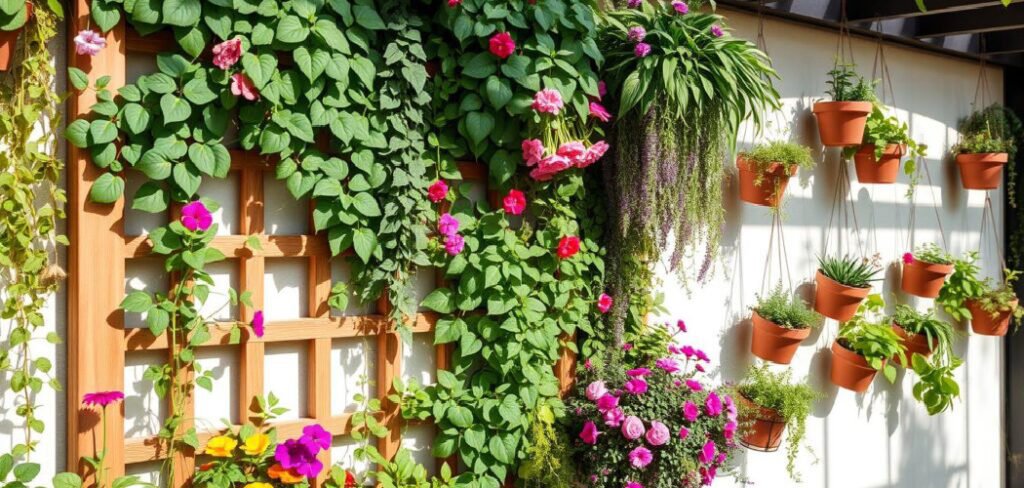
It might look complicated at first glance, but the process is actually quite straightforward. With a little planning and some basic gardening tools, anyone can transform a blank surface into a lush masterpiece. In this guide, we will walk you through exactly how to make a vine wall that is both durable and beautiful, ensuring you have all the knowledge needed to succeed.
Why You Should Build a Living Vine Wall
There are countless reasons to add a vertical garden feature to your home. First and foremost, it serves as a stunning visual anchor that softens hard architectural lines. Brick, concrete, and wood structures often feel rigid, but the organic flow of leaves breaks up that monotony instantly. Beyond aesthetics, these green features are functional. They provide excellent natural cooling by shading walls from direct sunlight, which can actually lower the temperature of your home during hot summer months.
Furthermore, they act as incredible privacy screens. If you live in a dense neighborhood or have a balcony that feels too exposed, a dense layer of foliage creates a secluded retreat without the need for harsh, unfriendly barriers. Finally, vertical gardening is a smart use of space. You can grow a massive amount of greenery without sacrificing valuable square footage on your patio or lawn.
8 Step-by-Step Guide on How To Make A Vine Wall
Step 1: Choose The Ideal Location
Selecting the perfect spot is the most critical decision you will make before picking up any tools. You need to observe the sunlight patterns in your yard or on your patio for a few days. Most flowering vines require at least six hours of direct sunlight to thrive, while foliage-heavy vines like ivy might prefer a shadier spot.

You must also consider the wall surface itself. Ensure the structure behind your future garden can handle potential moisture and the weight of mature plants. If you are planting against a wooden fence or the side of your house, you need to ensure there is adequate airflow to prevent rot or structural damage over time.
Step 2: Select Your Climbing Plants
The success of your project depends heavily on choosing the right plant for your specific climate and aesthetic goals. If you want year-round privacy, you should look for evergreen options like star jasmine or English ivy that keep their leaves during winter. For a burst of seasonal color, flowering varieties such as clematis, wisteria, or climbing roses are spectacular choices. You should also consider the growth speed of the plant. Some vines, like morning glories, grow incredibly fast and provide quick coverage, while others take years to establish. Research the maintenance level of each plant to ensure it matches the amount of time you want to spend gardening.
Step 3: Gather Essential Tools And Materials
Before you start drilling, it is essential to have everything organized and ready to go. You will need a reliable power drill with masonry or wood bits, depending on your wall type. You also need heavy-duty eye hooks or vine eyes, galvanized wire or stainless steel cable, and turnbuckles to keep the wire taut. Pliers and wire cutters are necessary for manipulating the cable. If you are planting in the ground, have a shovel and compost ready. If you are using containers, ensure you have large pots with drainage holes and high-quality potting mix. Gathering these items beforehand makes the process of how to make a vine wall much smoother and more enjoyable.
Step 4: Map Out Your Grid Pattern
Planning your design on the wall prevents mistakes and ensures your vines cover the area evenly. You should use a piece of chalk or a pencil to mark exactly where you want your anchors to go. A diamond pattern or a simple square grid are the most common and effective designs for supporting climbing plants.

The distance between your anchors depends on the type of vine you chose. Heavier, woody vines need anchors spaced closer together, perhaps every twelve to eighteen inches, to support their weight. Lighter annual vines can span wider distances. Taking time to measure and level your marks now will result in a professional-looking finish later.
Step 5: Install The Wall Anchors
Once your pattern is marked, it is time to secure the hardware to the wall. If you are drilling into masonry, brick, or stucco, you must use plastic wall plugs or lead shields to ensure the eye hooks do not pull out under the weight of the plants. For wooden fences or siding, you can usually screw the eye hooks directly into the wood. Drive the hooks in firmly, leaving the eyelet exposed and oriented in the direction the wire will run. This infrastructure is the backbone of your living wall. It must be incredibly secure because a mature vine, especially when wet from rain, can be surprisingly heavy.
Step 6: String And Tighten The Wire
With your anchors securely in place, you can now run the wire to create the trellis structure. Start at the bottom corner and thread your galvanized wire or stainless steel cable through the eye hooks following your grid pattern. At the end of each run or at the corners, you should install a turnbuckle. This small piece of hardware allows you to tighten the wire later if it begins to sag. Pull the wire as tight as you can by hand, secure it with wire clamps or by twisting it firmly with pliers, and then use the turnbuckles to add that final tension. A taut wire system is essential for a neat appearance.
Step 7: Prepare The Soil Or Containers
Your plants need a healthy foundation to grow tall and strong. If you are planting directly into the ground, dig a trench at the base of your wall about a foot deep and wide. Amend the native soil with plenty of organic compost and perhaps some slow-release fertilizer to encourage vigorous root growth.

If you are using containers, place them directly beneath the trellis structure. Fill them with a premium potting mix that offers excellent drainage. Poor drainage can lead to root rot, which will kill your vines quickly. The quality of your soil preparation is a huge factor in how to make a vine wall that remains lush for years.
Step 8: Plant And Train The Vines
Now comes the exciting part where you actually put the plants in the ground. Dig holes slightly larger than the root balls of your vines and space them according to the plant tag instructions. Gently place the plants in the holes and backfill them with soil, pressing down lightly to remove air pockets. Immediately after planting, take the longest tendrils of the vines and gently wrap them around the bottom wires of your trellis. You can use soft plant ties or garden twine to loosely secure them to the wire. This initial training teaches the plant where to go and encourages upward growth right from the start.
Watering And Ongoing Maintenance
The final step is establishing a care routine to keep your wall thriving. Water the new plants deeply immediately after planting and keep the soil consistently moist for the first few weeks as they establish roots. As the vines grow, you will need to continue training them by weaving new shoots through the wire grid to ensure even coverage. Pruning is also necessary to keep the wall looking tidy and to prevent the vines from encroaching on windows, gutters, or neighbors’ property. Regular feeding with a balanced fertilizer during the growing season will ensure your living wall stays vibrant, dense, and healthy throughout the year.
Frequently Asked Questions (FAQ)
What Are The Best Vines For Beginners To Use?
For those new to gardening, English Ivy and Boston Ivy are excellent choices because they are hardy and grow quickly. However, they can be aggressive. Star Jasmine is another fantastic option; it is relatively easy to care for, smells wonderful, and offers beautiful white flowers. If you want something edible, runner beans or passion fruit vines are fun, fast-growing options that serve a dual purpose of food and privacy.
How Long Does It Take For A Vine Wall To Fill In?
The time it takes depends entirely on the plant species and your climate. Fast-growing annuals like Morning Glories can cover a trellis in a single summer season, providing instant gratification. Perennial woody vines like Wisteria or Climbing Hydrangea are much slower and may take three to five years to fully cover a large wall. patience is key with perennials, but the long-term payoff is a permanent, robust living structure.

Can I Build A Vine Wall Indoors?
Yes, you absolutely can build an indoor vine wall using species like Pothos, Philodendron, or Hoya. You will need to ensure they have adequate light, either from a large window or supplemental grow lights. Indoor trellising works the same way, though you might use lighter-weight materials like fishing line or smaller hooks. Be careful with watering indoors to ensure you have trays to catch runoff so you do not damage your floors.
Will Vines Damage My House Or Fence?
Some vines, particularly those with aerial roots like Ivy or Trumpet Vine, can damage mortar, brick, and wood by digging into crevices. This is why using a wire trellis system is superior. It keeps the plant material slightly off the wall surface, allowing for airflow and preventing direct contact with the building materials. By training the vines onto the wires rather than letting them attach to the wall, you minimize damage risks.
How Do I Care For The Wall In The Winter?
If you planted evergreen vines, you simply need to ensure they stay hydrated if the winter is dry. For deciduous vines that lose their leaves, winter is the perfect time for structural pruning. You should cut back dead or tangled growth to reveal the framework and promote healthy spring shoots. If you have potted vines in a very cold climate, you may need to wrap the pots in burlap or move them to a sheltered area to prevent the roots from freezing.
Conclusion
Building a vertical garden is a satisfying project that completely changes the atmosphere of your outdoor living space. It brings nature closer to you, softens architectural edges, and provides a habitat for local wildlife. By following these steps and choosing the right plants for your environment, you can create a feature that will be the envy of the neighborhood. Remember that patience is essential; gardening is a marathon, not a sprint. However, now that you understand how to make a vine wall, you have all the tools necessary to get started this weekend and watch your green oasis grow.
About Ravuk Barg
B.Sc. Horticulture Science | Certified Master Gardener
Ravuk Barg has spent more than a decade with his hands in the soil and his head full of questions about why some gardens thrive while others struggle. What started as a single raised bed of tomatoes and basil in a modest backyard has grown into a deep, working knowledge of everything from seed germination and soil amendment to companion planting and seasonal pruning.
Over the years, Ravuk has gardened through drought summers, waterlogged springs, and pest invasions that would make most gardeners hang up their trowels for good. Those hard seasons, he’ll tell you, taught him more than any perfect growing year ever could. He writes from that earned experience—covering vegetable growing, ornamental planting, houseplant care, composting, and garden design with equal confidence and curiosity.
Philosophy & Approach
Ravuk’s approach to gardening is rooted in practicality. He favors organic methods not out of dogma, but because they work long-term—resulting in healthier soil, fewer inputs, and stronger plants. He has a particular fondness for heirloom vegetable varieties (the kind with proper flavor), unruly cottage-style flower beds, and the stubborn houseplants that everyone else gave up on.
The Mission: Give readers the honest, experience-backed advice that helps them actually succeed in their gardens—not just the ideal version, but the real one; weeds, failures, and all.
Education & Credentials
-
B.Sc. in Horticulture Science
-
Greenfield Agricultural University
-
Focus: Plant Physiology, Soil Ecology, and Sustainable Crop Production
-
-
Master Gardener Certification
-
Cooperative Extension Service
-
Focus: 200+ hours of hands-on practical training and community garden work
-
Continuing Education
-
Organic Pest Management
-
Native Plant Landscaping
-
Sustainable Crop Production