

Milkweed is a vital plant for monarch butterflies, but it can sometimes fall prey to fungal diseases. Spotting yellowing leaves, dark spots, or a powdery white coating on your plants can be disheartening for any gardener. These symptoms often point to a fungal infection, which, if left unchecked, can weaken the plant and reduce its ability to support monarch caterpillars. Fortunately, learning how to treat milkweed fungus is straightforward and can quickly restore the health of your garden.
This guide will walk you through identifying the problem, understanding its causes, and implementing effective, beginner-friendly solutions to keep your milkweed thriving.
Why Treating Milkweed Fungus Matters
Addressing fungal issues on your milkweed is crucial for several reasons. First and foremost, healthy milkweed is essential for the survival of monarch butterflies. As the sole host plant for their caterpillars, a robust milkweed patch ensures a reliable food source for the next generation of monarchs. Fungal diseases can diminish the plant’s foliage, making it less nutritious or even toxic for caterpillars. Furthermore, untreated fungus can spread to other plants in your garden, creating a larger problem.
By actively managing these diseases, you not only protect your milkweed but also contribute to a healthier local ecosystem and support these iconic pollinators.
8 Step-by-Step Guide on How to Treat Milkweed Fungus
Step 1: Identify the Fungal Disease
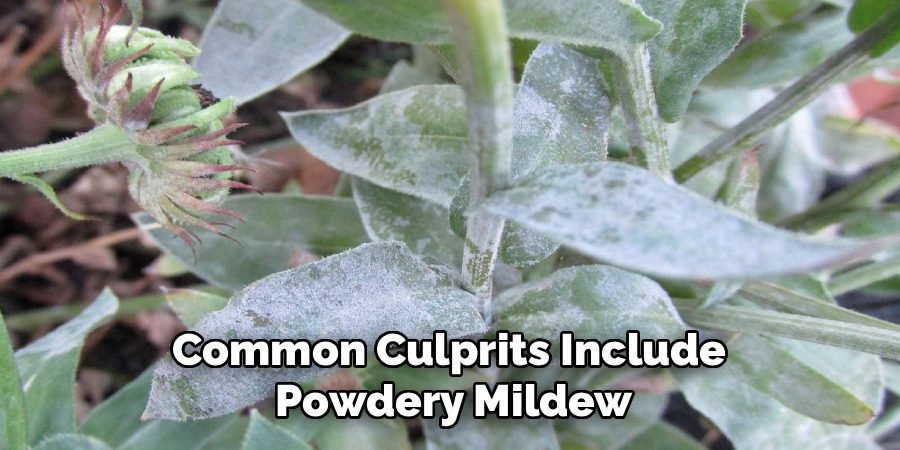
The first step is to correctly identify the type of fungus affecting your milkweed. Common culprits include powdery mildew, which appears as a white, dusty coating on leaves, and leaf spot, which presents as dark, circular lesions. Observe the affected areas closely. Are the spots black, brown, or yellow? Is the growth fuzzy or powdery? Proper identification is key because it dictates the most effective treatment method. Powdery mildew, for instance, thrives in humid conditions with poor air circulation, while leaf spot fungi often spread through water splashing from infected soil onto the leaves.
Step 2: Prune Infected Leaves and Stems
Once you have identified the fungus, your immediate action should be to remove and destroy the affected parts of the plant. Use a clean, sharp pair of pruning shears or scissors to snip off any leaves, stems, or flowers showing signs of infection. Be thorough and remove anything with spots, discoloration, or powdery residue. This step is critical for preventing the fungus from spreading to healthy parts of the plant and to neighboring milkweed. Do not compost the infected plant material, as the fungal spores can survive and reinfect your garden later. Instead, bag it and dispose of it in the trash.
Step 3: Improve Air Circulation
Fungi flourish in damp, stagnant environments. To create less favorable conditions for fungal growth, focus on improving air circulation around your milkweed plants. If your plants are growing too closely together, consider thinning them out to allow more space between each one. This simple act enables air to move freely, which helps leaves dry more quickly after rain or morning dew. Additionally, pruning lower branches that are heavily shaded can increase airflow at the base of the plant. A well-ventilated garden is one of the best preventative measures against future fungal outbreaks.
Step 4: Apply a Fungicide Solution
For persistent or widespread infections, applying a fungicide can be an effective part of learning how to treat milkweed fungus. You can create a simple, homemade solution by mixing one tablespoon of baking soda and one teaspoon of mild, non-detergent soap into a gallon of water. Another popular option is a diluted neem oil spray, which acts as both a fungicide and an insecticide. When applying any treatment, spray the entire plant, making sure to cover the undersides of leaves where fungi often hide. Apply the solution in the early morning or late evening to avoid scorching the leaves in direct sunlight.
Step 5: Adjust Your Watering Habits
Improper watering techniques are a leading cause of fungal diseases in gardens. Fungi spread easily through water, so it’s important to water your milkweed correctly. Always water the plants at the base, directly onto the soil, rather than overhead. This practice keeps the foliage dry, denying fungal spores the moisture they need to germinate and spread. It’s also best to water in the morning, which gives the plant and surrounding soil plenty of time to dry out before the cooler temperatures of the evening set in. Deep, infrequent watering is preferable to frequent, shallow watering.

Step 6: Apply Mulch to the Soil
Applying a layer of organic mulch around the base of your milkweed plants can be surprisingly effective in controlling fungal diseases. Mulch, such as wood chips or straw, creates a physical barrier between the soil and the plant’s lower leaves. Many fungal pathogens, particularly those causing leaf spot, reside in the soil and are splashed onto the plant during rain or watering. By covering the soil surface with a two- to three-inch layer of mulch, you can significantly reduce this splash-back effect, keeping the foliage clean and healthy. Mulch also helps retain soil moisture and suppress weeds.
Step 7: Monitor Plants Regularly
Vigilance is a gardener’s best tool. After you have treated your milkweed, make it a habit to inspect your plants regularly—at least once or twice a week. Look for any new signs of fungal growth, such as new spots or a returning powdery film. Early detection allows you to act quickly, often by just pruning a single leaf before the problem can escalate. Regular monitoring also helps you understand the conditions in your garden that might be contributing to the issue, allowing you to make proactive adjustments to your care routine.
Step 8: Consider Resistant Milkweed Varieties
If you consistently struggle with fungal issues despite your best efforts, consider planting milkweed species known for their natural resistance to common diseases. While all milkweed can be susceptible under the right conditions, some varieties are hardier than others. For example, Swamp Milkweed (Asclepias incarnata) thrives in moist conditions and often shows better resistance to the fungi that plague Common Milkweed (Asclepias syriaca) in damp environments. Researching species that are well-suited to your specific climate and garden conditions can save you a lot of effort in the long run.
Frequently Asked Questions (FAQ)
Is Fungus on Milkweed Harmful to Monarch Caterpillars?
In most cases, a mild fungal infection on milkweed leaves is not directly harmful to monarch caterpillars if they consume it. However, a severe infection can degrade the quality of the leaves, reducing their nutritional value. The bigger risk is that the fungus can cause the leaves to wither and die, depleting the caterpillars’ food source. Therefore, it is always best to manage fungal outbreaks to ensure the plants remain healthy and can provide ample food for monarch larvae.

Can I Use a Commercial Fungicide on My Milkweed?
You can use commercial fungicides, but it is critical to choose one that is safe for pollinators and wildlife. Always look for products specifically labeled as organic or safe for use in vegetable gardens. Copper fungicides and sulfur-based sprays are common options. Read and follow the label instructions carefully, paying close attention to application rates and timing. Avoid spraying when monarch caterpillars or adult butterflies are present on the plants to minimize their exposure to the treatment.
How Can I Prevent Milkweed Fungus in the First Place?
Prevention is always the best strategy. To prevent fungus, ensure your milkweed has good air circulation by spacing plants appropriately. Water at the base of the plant in the morning to keep leaves dry. Clean up and dispose of all dead plant debris in the fall, as fungal spores can overwinter in it. Applying a layer of mulch can also prevent soil-borne fungi from splashing onto leaves. A healthy, well-cared-for plant is naturally more resistant to disease.
Will Milkweed Fungus Go Away on Its Own?
In some cases, a very minor fungal issue might resolve itself if environmental conditions change—for example, if a rainy, humid period is followed by dry, sunny weather. However, it is generally not a good idea to wait and see. Fungal diseases can spread rapidly and weaken the plant, making it more vulnerable to other pests and stressors. Proactive treatment, even just pruning a few affected leaves, is the most reliable approach to stopping the infection before it becomes a serious problem for the plant.
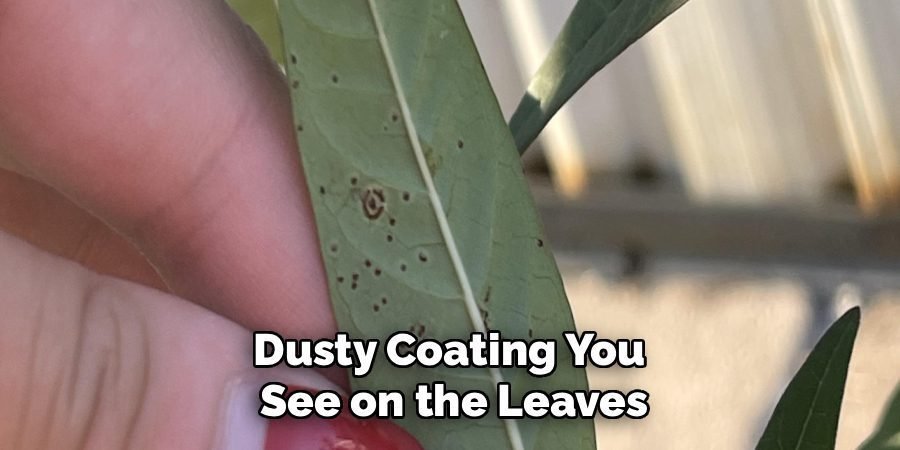
Does Powdery Mildew Affect Milkweed Pods?
Yes, powdery mildew can affect all parts of the milkweed plant, including the leaves, stems, and seed pods. When it appears on pods, it looks like the same white, dusty coating you see on the leaves. While it may not prevent the seeds inside from developing, a heavy infection can potentially hinder the pod’s ability to open and disperse its seeds naturally. If you notice mildew on the pods, you can gently wipe it off with a damp cloth or treat it with the same fungicide spray you would use on the leaves.
Conclusion
Caring for milkweed is a rewarding way to support monarch butterflies, and managing the occasional fungal disease is a key part of that process. By learning to identify common fungi, prune infected areas, and adjust your garden practices, you can effectively resolve these issues. Simple changes to improve air circulation and watering techniques go a long way in preventing future outbreaks. Remember that the goal is to keep your plants healthy and strong.
Armed with this knowledge on how to treat milkweed fungus, you are well-equipped to maintain a vibrant milkweed patch that will serve as a thriving sanctuary for monarchs for years to come.
About Ravuk Barg
B.Sc. Horticulture Science | Certified Master Gardener
Ravuk Barg has spent more than a decade with his hands in the soil and his head full of questions about why some gardens thrive while others struggle. What started as a single raised bed of tomatoes and basil in a modest backyard has grown into a deep, working knowledge of everything from seed germination and soil amendment to companion planting and seasonal pruning.
Over the years, Ravuk has gardened through drought summers, waterlogged springs, and pest invasions that would make most gardeners hang up their trowels for good. Those hard seasons, he’ll tell you, taught him more than any perfect growing year ever could. He writes from that earned experience—covering vegetable growing, ornamental planting, houseplant care, composting, and garden design with equal confidence and curiosity.
Philosophy & Approach
Ravuk’s approach to gardening is rooted in practicality. He favors organic methods not out of dogma, but because they work long-term—resulting in healthier soil, fewer inputs, and stronger plants. He has a particular fondness for heirloom vegetable varieties (the kind with proper flavor), unruly cottage-style flower beds, and the stubborn houseplants that everyone else gave up on.
The Mission: Give readers the honest, experience-backed advice that helps them actually succeed in their gardens—not just the ideal version, but the real one; weeds, failures, and all.
Education & Credentials
-
B.Sc. in Horticulture Science
-
Greenfield Agricultural University
-
Focus: Plant Physiology, Soil Ecology, and Sustainable Crop Production
-
-
Master Gardener Certification
-
Cooperative Extension Service
-
Focus: 200+ hours of hands-on practical training and community garden work
-
Continuing Education
-
Organic Pest Management
-
Native Plant Landscaping
-
Sustainable Crop Production