

A well-manicured lawn is a source of pride for any homeowner, but achieving that perfect, even cut requires a well-maintained mower. One of the most critical, yet often overlooked, aspects of mower maintenance is ensuring the blades are properly secured. A loose blade can cause a ragged, unhealthy cut, leading to brown and torn grass tips. More importantly, it presents a significant safety hazard.
Learning how to tighten lawn mower blades is a fundamental skill that enhances your mower’s performance, improves your lawn’s health, and ensures you can mow safely. This guide will walk you through the process step by step, providing the confidence you need to tackle this essential task yourself. It’s a straightforward job that anyone with the right tools and a bit of patience can master, saving you a trip to the repair shop and keeping your lawn looking its best all season long.
Why Keeping Your Mower Blades Tight is Crucial
You might wonder why there’s so much emphasis on a single nut or bolt. The answer lies in both performance and safety. A lawn mower blade spins at thousands of revolutions per minute (RPM). If a blade is loose, it will vibrate excessively. This vibration not only results in an uneven, choppy cut that damages your grass but also puts immense strain on the mower’s engine and spindle. Over time, this can lead to costly mechanical failures.
8 Step-by-Step Guide on How to Tighten Lawn Mower Blades
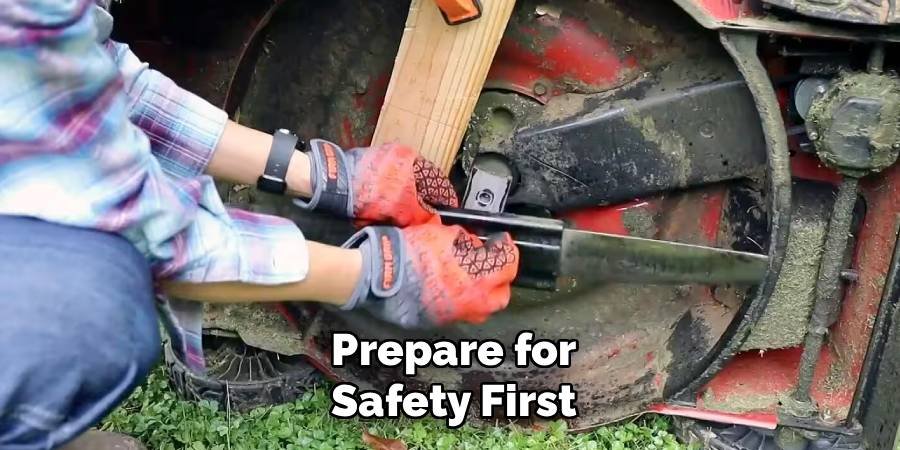
Step 1: Prepare for Safety First
Before you even think about touching the mower blade, your top priority is safety. Disconnect the spark plug wire to completely eliminate any chance of the engine accidentally starting while you work. For electric mowers, unplug the power cord or remove the battery. It’s also wise to wear a pair of thick work gloves to protect your hands from the sharp edges of the blade. Finally, position your mower on a flat, stable surface like a garage floor or driveway. This ensures the mower won’t tip or roll over unexpectedly, providing a secure environment for the task ahead.
Step 2: Access the Mower Blade
To get to the blade, you will need to safely tilt the lawn mower. The correct way to do this is to tip it backward, so the handle rests on the ground. Never tilt a gas-powered mower on its side, as this can cause oil to leak into the carburetor or fuel to spill from the gas cap, creating a fire hazard and potential engine damage. Once the mower is securely tilted, you will have a clear view of the underside of the deck and the blade assembly. If your mower is heavy, ask for assistance to avoid strain or injury.
Step 3: Block the Blade from Rotating
When you try to loosen or tighten the central nut or bolt, the blade will naturally want to spin with it. To prevent this, you must secure the blade in place. The most common method is to use a blade removal tool or a simple block of wood. Wedge the piece of wood firmly between the end of the blade and the inside of the mower deck. This will stop the blade from rotating, allowing you to apply the necessary force to the nut without the entire assembly moving. Ensure the block is snug and won’t slip out as you apply pressure.
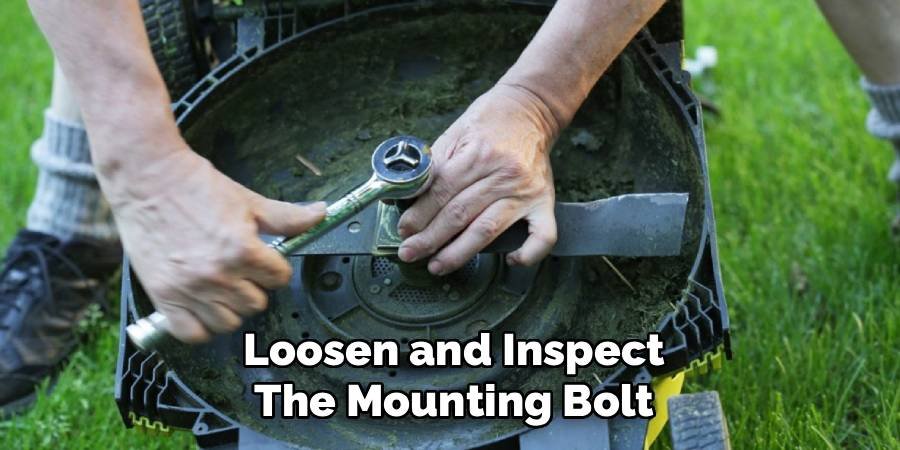
Step 4: Loosen and Inspect the Mounting Bolt
Using a socket wrench or breaker bar that fits the mounting bolt, turn the bolt counter-clockwise to loosen it. It might be very tight, especially if it hasn’t been removed in a while, so you may need to apply steady, firm pressure. Once the bolt is loose, carefully remove it along with any washers. Take a moment to inspect the bolt and the blade itself. Check the bolt threads for any signs of stripping or damage. Examine the blade for cracks, significant dents, or excessive wear. If the bolt or blade is damaged, it must be replaced.
Step 5: Clean the Blade and Mounting Area
With the blade removed, take the opportunity to clean the underside of the mower deck and the blade itself. Scrape off any caked-on grass, dirt, and debris using a putty knife or wire brush. A clean mounting surface is essential for a secure fit. Make sure the area around the blade spindle is completely clean. This ensures that the blade sits flush against the mounting point, which is critical for proper balance and a secure connection. A clean assembly helps prevent vibrations and ensures the blade is properly aligned when you re-install it.
Step 6: Sharpen or Replace the Blade
A tight blade is important, but a sharp one is what gives you a clean cut. Inspect the cutting edges of the blade. If they are dull, nicked, or rounded, now is the perfect time to sharpen them. You can use a bench grinder, a file, or a blade sharpening attachment for your drill. Maintain the original angle of the cutting edge for best results. After sharpening, check the blade’s balance by hanging it on a nail on the wall. If one side dips, grind a small amount of metal from the back of the heavier side until it balances perfectly.

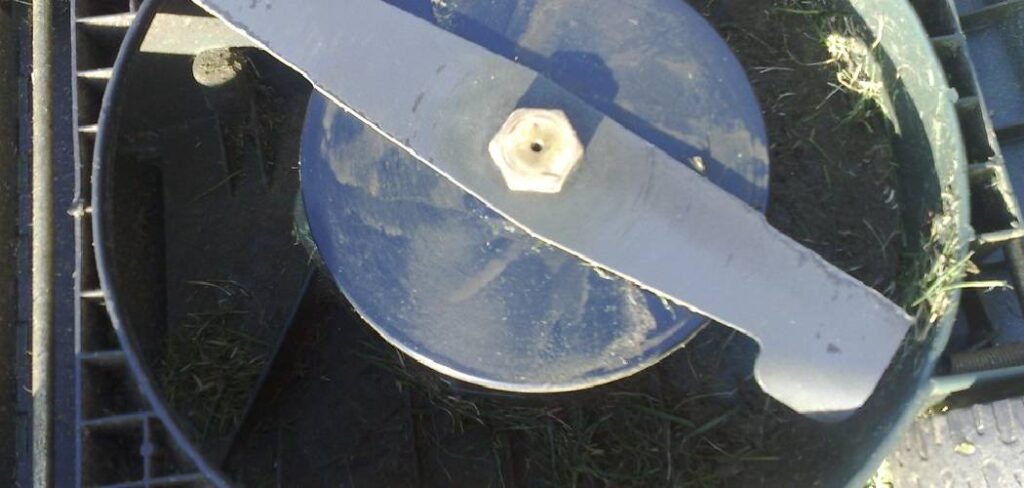
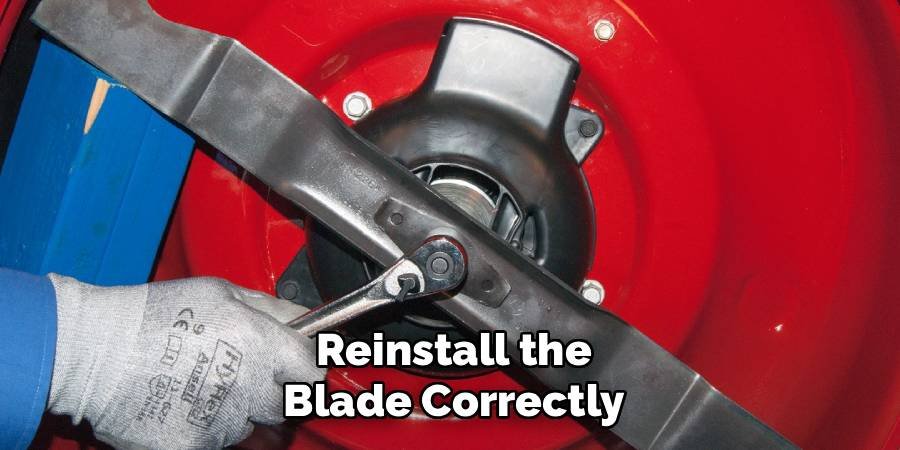
Step 7: Reinstall the Blade Correctly
Position the sharpened or new blade back onto the mower’s spindle. Most blades have markings like “Grass Side” or “This Side Down” to ensure correct orientation. The cutting edges should be pointing in the direction of the blade’s rotation, which is typically clockwise. If you install it upside down, it won’t cut the grass effectively. Make sure the blade is seated properly on the spindle adapter’s star pattern or tabs. An improperly seated blade will not be secure, even when tightened, and will cause severe vibrations.
Step 8: How to Tighten Lawn Mower Blades Securely
Once the blade is correctly positioned, re-insert the washers and the mounting bolt. Hand-tighten the bolt first to ensure it is not cross-threaded. Then, using your socket wrench, turn the bolt clockwise to tighten it. This is the most important part of how to tighten lawn mower blades. The key is to make it very secure without over-tightening. Use your blade-blocking tool again to prevent rotation. You need to apply significant torque to ensure the bolt won’t loosen from the engine’s vibrations. Refer to your owner’s manual for the specific torque specification for your mower model.
Frequently Asked Questions (FAQ)
How Do I Know if My Lawn Mower Blade Is Loose?
You can usually tell if a blade is loose by the quality of the cut and the sound of the mower. Signs of a loose blade include:
- An unusually loud or rattling noise coming from under the deck.
- Excessive vibration that you can feel through the mower handle.
- A ragged, torn, or uneven cut on your grass blades instead of a clean slice.
If you suspect a loose blade, stop mowing immediately, disconnect the spark plug, and perform a physical check.
What Tools Do I Need to Tighten a Mower Blade?
The basic tools required are quite common. You will need a socket wrench set with an extension or a breaker bar to fit the blade’s mounting bolt, a block of wood or a specialized blade removal tool to hold the blade steady, and thick work gloves for safety. For the most accurate and safe results, a torque wrench is highly recommended to ensure you tighten the bolt to the manufacturer’s specified torque. A wire brush and putty knife are also helpful for cleaning.
How Tight Should a Lawn Mower Blade Be?
A lawn mower blade should be very tight to prevent it from loosening due to engine vibrations. However, over-tightening can strip the bolt threads or damage the spindle. The best practice is to use a torque wrench and tighten the bolt to the manufacturer’s specification, which is typically found in your owner’s manual. This value is usually between 30 and 50 foot-pounds (ft-lbs). If you don’t have a torque wrench, tighten it as firmly as you can with a standard socket wrench.
Can a Lawn Mower Blade Be Too Tight?
Yes, it is possible to over-tighten a lawn mower blade. Applying excessive torque can damage the threads on the bolt or the spindle it screws into. In a worst-case scenario, you could even shear the bolt off completely. This is why using a torque wrench is the ideal method, as it ensures you apply the precise amount of force recommended by the manufacturer. It prevents both under-tightening, which is a safety risk, and over-tightening, which can cause damage.
How Often Should I Check My Mower Blades?
It’s a good habit to check your mower blades for tightness and sharpness periodically throughout the mowing season. A quick check at the beginning of the season is a must. After that, a good rule of thumb is to inspect them after every 20-25 hours of use or at least once a month, depending on how frequently you mow and the conditions of your lawn. If you know you’ve hit a hard object like a rock or large root, you should stop and inspect the blade immediately.
Conclusion
Mastering how to tighten your lawn mower blades is a skill that pays dividends in lawn health, mower longevity, and your personal safety. By following these steps, you can confidently perform this essential maintenance task without relying on a professional. You’ve learned the importance of safety precautions, the correct way to access and secure the blade, and the critical step of using a torque wrench for precision.
A properly secured, sharp blade ensures a clean, healthy cut for your grass and a smooth, efficient operation for your mower. Don’t let a loose blade compromise your safety or the beauty of your lawn. Now that you know how to tighten lawn mower blades, you have the power to keep your equipment in top condition.
About Ravuk Barg
B.Sc. Horticulture Science | Certified Master Gardener
Ravuk Barg has spent more than a decade with his hands in the soil and his head full of questions about why some gardens thrive while others struggle. What started as a single raised bed of tomatoes and basil in a modest backyard has grown into a deep, working knowledge of everything from seed germination and soil amendment to companion planting and seasonal pruning.
Over the years, Ravuk has gardened through drought summers, waterlogged springs, and pest invasions that would make most gardeners hang up their trowels for good. Those hard seasons, he’ll tell you, taught him more than any perfect growing year ever could. He writes from that earned experience—covering vegetable growing, ornamental planting, houseplant care, composting, and garden design with equal confidence and curiosity.
Philosophy & Approach
Ravuk’s approach to gardening is rooted in practicality. He favors organic methods not out of dogma, but because they work long-term—resulting in healthier soil, fewer inputs, and stronger plants. He has a particular fondness for heirloom vegetable varieties (the kind with proper flavor), unruly cottage-style flower beds, and the stubborn houseplants that everyone else gave up on.
The Mission: Give readers the honest, experience-backed advice that helps them actually succeed in their gardens—not just the ideal version, but the real one; weeds, failures, and all.
Education & Credentials
-
B.Sc. in Horticulture Science
-
Greenfield Agricultural University
-
Focus: Plant Physiology, Soil Ecology, and Sustainable Crop Production
-
-
Master Gardener Certification
-
Cooperative Extension Service
-
Focus: 200+ hours of hands-on practical training and community garden work
-
Continuing Education
-
Organic Pest Management
-
Native Plant Landscaping
-
Sustainable Crop Production