

Welcome to the world of vertical gardening, where you can maximize your growing space and create a stunning, productive garden. If you’ve been searching for a sturdy, affordable, and versatile material to build trellises, arches, and fences, look no further than cattle panels. These simple wire mesh grids are a game-changer for gardeners of all skill levels. This guide will walk you through everything you need to know about how to use cattle panels in the garden, from planning your project to installing them and watching your plants thrive. Get ready to transform your garden space with this durable and practical solution.
Why Use Cattle Panels in the Garden?
Cattle panels, originally designed for livestock enclosures, have become a favorite tool for home gardeners, and for good reason. Their primary benefit is their exceptional durability. Made from heavy-gauge galvanized steel, they can withstand harsh weather conditions for years without rusting or breaking down, unlike wood or plastic alternatives. This longevity makes them a cost-effective investment for your garden infrastructure.
Their versatility is another major advantage. The sturdy grid structure is perfect for creating strong trellises for vining plants like cucumbers, tomatoes, beans, and squash. This lifts the plants off the ground, improving air circulation, reducing disease, and making harvesting easier. You can also bend them into beautiful arches, creating an inviting entrance to your garden or a picturesque tunnel of flowers or vegetables. Furthermore, they serve as effective and attractive fences to protect your beds from pests or define garden spaces.
8 Step-by-Step Guide: How to Use Cattle Panels in the Garden
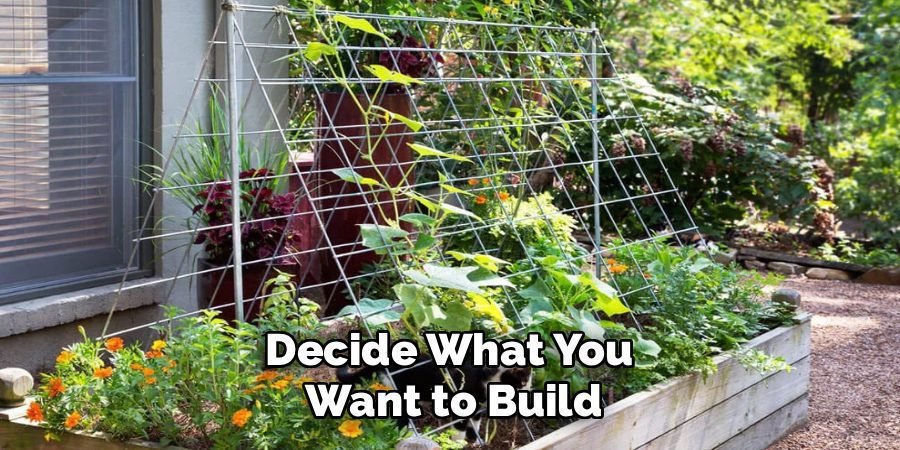
Step 1: Plan Your Garden Project
Before you buy anything, create a clear plan. Decide what you want to build. Are you making a flat trellis for a wall, a freestanding A-frame for vining squash, or an archway for climbing roses? Measure the intended area carefully to determine the size and number of panels you’ll need. Standard cattle panels are typically 16 feet long and 50 inches tall. Sketching your design on paper can help you visualize the final result and anticipate any potential challenges with spacing or placement.
Step 2: Gather Your Materials and Tools
Once your plan is set, it’s time to gather your supplies. The main item is, of course, the cattle panel itself, available at farm supply stores. You will also need sturdy posts to support the panel, such as metal T-posts or wooden posts. For securing the panel to the posts, grab some zip ties, wire, or U-shaped nails. Essential tools include a sledgehammer or post driver for setting the posts, a tape measure, a level, wire cutters, and safety gear like heavy-duty gloves and safety glasses.
Step 3: Prepare the Garden Area
Proper site preparation is key to a stable and long-lasting structure. Clear the designated area of any weeds, rocks, or debris. If you are installing the panel directly into a garden bed, ensure the soil is level. Mark the locations where your support posts will go according to your plan. For a simple trellis, posts are typically placed at each end of the panel. For a 16-foot panel, adding a central post provides extra stability, especially in windy locations or for heavy-bearing plants.
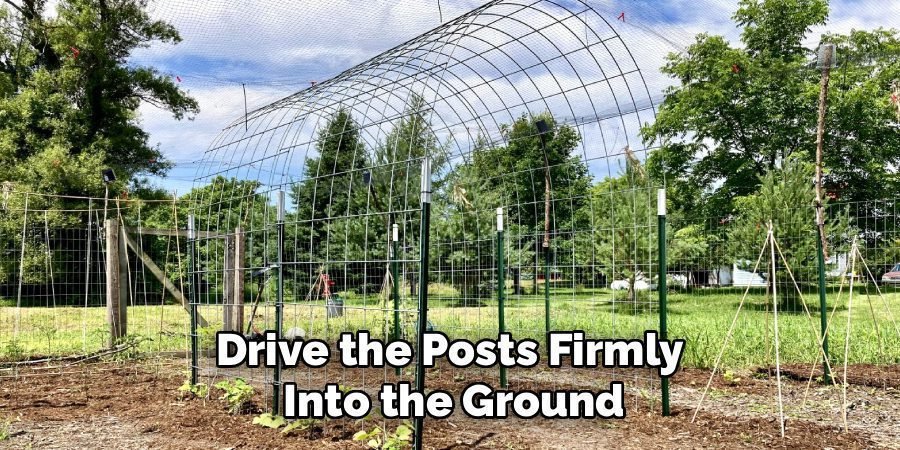
Step 4: Install the Support Posts
With your post locations marked, it’s time to install them. Using a sledgehammer or a T-post driver, drive the posts firmly into the ground. Aim for at least one to two feet of depth to ensure they are secure and can support the weight of the panel and mature plants. Use a level to check that each post is straight and vertically aligned. Properly installed posts are the foundation of your structure, so take your time to get this step right for maximum stability.
Step 5: Cut the Panel to Size (If Necessary)
Sometimes, a full 16-foot panel is too large for your project. If you need to cut the panel, this is a crucial step. Use a pair of bolt cutters or an angle grinder with a cutting wheel for this task. Always wear safety glasses and gloves, as cutting the thick wire can send small metal fragments flying. Measure twice and cut once to ensure accuracy. The cut ends will be sharp, so you may want to file them down or cover them with rubber caps for safety.
Step 6: Position and Secure the Panel
This step often requires a helper, as cattle panels can be awkward to handle alone. Position the panel against your installed posts. Use your level to make sure it is straight horizontally. Once you are happy with the placement, secure the panel to the posts. Heavy-duty zip ties are a quick and easy option. For a more permanent and robust connection, use galvanized wire or U-shaped nails (for wooden posts). Attach the panel at the top, middle, and bottom of each post.
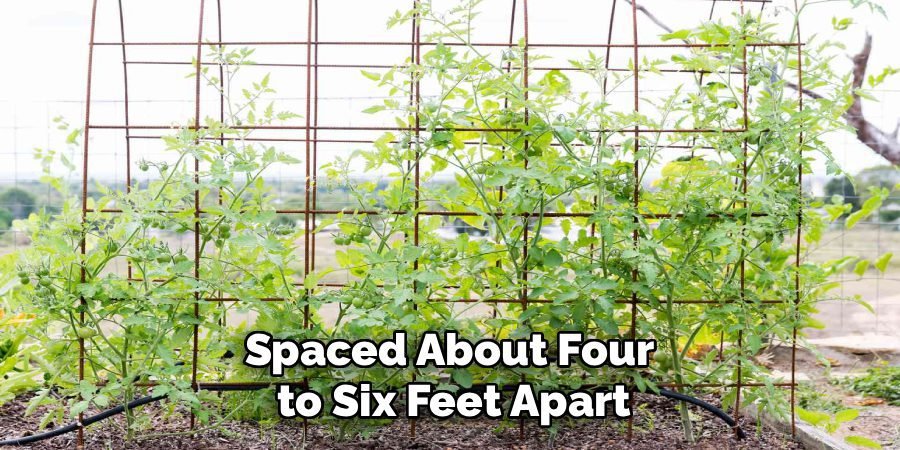
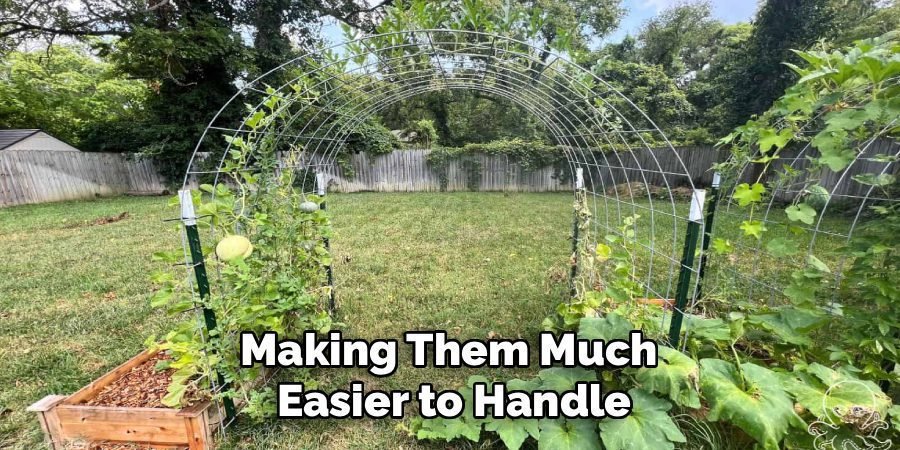
Step 7: Create an Arch Trellis
If your goal is to create an arch, the process is slightly different. First, install two rows of T-posts or wooden posts parallel to each other, spaced about four to six feet apart. The distance will determine the height and curve of your arch. With a helper, take a full 16-foot panel and carefully bend it into an arc, placing each end against the inside of the opposing rows of posts. Secure the base of the panel to the posts with wire or zip ties.
Step 8: Plant Your Vining Crops
With your structure complete, the fun part begins! Plant your vining vegetables or flowers at the base of the trellis. Good options include pole beans, peas, cucumbers, small melons, squash, and climbing flowers like morning glories or clematis. As the plants grow, gently guide their tendrils to latch onto the wire grid. The open mesh provides plenty of support, and soon your plants will be climbing upward, creating a lush, green wall or a beautiful, productive archway.
Maintenance
Proper care is essential to ensure your trellis and plants thrive throughout the growing season. Regularly inspect the trellis for any signs of damage or wear, tightening or repairing the structure as needed. Prune your climbing plants to encourage healthy growth, prevent overcrowding, and improve air circulation. Water your plants at the base to keep the roots hydrated, and apply mulch to retain moisture and suppress weeds. Keep an eye out for pests or diseases, and address any issues promptly to protect your crops or flowers. With consistent maintenance, your trellis garden will remain a vibrant and productive feature of your space.
Frequently Asked Questions (FAQ)
What Is the Best Way to Transport Cattle Panels?
Transporting a 16-foot cattle panel can be tricky. If you have a pickup truck with an 8-foot bed, you can carefully bend the panel into a “U” shape and fit it inside. Secure it with ratchet straps to prevent it from springing open. For those with a smaller vehicle or trailer, many farm supply stores will cut panels to your desired length for a small fee, making them much easier to handle.
How Do You Make a Tomato Cage Out of a Cattle Panel?
You can create incredibly sturdy tomato cages.
- Cut a section of the panel about 4-5 feet long.
- Bend this section into a circle or a square, creating a cylinder.
- Secure the ends together using wire or heavy-duty zip ties.
- Place the cage over your young tomato plant.
This structure provides excellent support for heavy-bearing indeterminate tomato varieties and will last for many seasons.
What Kind of Posts Should I Use?
Metal T-posts are the most popular choice for supporting cattle panels. They are durable, easy to install with a post driver, and have notches that help with securing the panel. Wooden posts (4x4s are a good size) are another excellent option, offering a more rustic aesthetic. They are very sturdy but require more effort to install, as you may need to dig holes and set them with concrete for maximum stability.
Can You Paint Cattle Panels?
Yes, you can paint cattle panels. If you want to add a pop of color to your garden or help the panel blend in, painting is a great option. First, clean the panel thoroughly to remove any dirt or oil. Then, apply a metal primer designed for galvanized steel. Once the primer is dry, you can apply an exterior-grade metal paint in the color of your choice. A spray paint application often provides the most even coverage.
How Long Do Cattle Panels Last in the Garden?
Cattle panels are known for their longevity. Because they are made of heavy-gauge, galvanized steel, they are highly resistant to rust and corrosion. In most garden settings, a cattle panel can easily last for 15-20 years or even longer with minimal maintenance. This makes them a far more durable and sustainable option compared to wooden trellises that may rot or plastic netting that can degrade in the sun.
Conclusion
Cattle panels are a simple, effective, and economical solution for adding structure and vertical interest to any garden. Their strength and versatility allow for endless creativity, from functional trellises that boost your harvest to beautiful arches that elevate your garden’s design. They are a one-time investment that will serve you well for many years, supporting your plants and helping you make the most of your available space. Now that you know how to use cattle panels in the garden, you are ready to start your next project and enjoy the rewards of a more productive and beautiful growing area.
About Ravuk Barg
B.Sc. Horticulture Science | Certified Master Gardener
Ravuk Barg has spent more than a decade with his hands in the soil and his head full of questions about why some gardens thrive while others struggle. What started as a single raised bed of tomatoes and basil in a modest backyard has grown into a deep, working knowledge of everything from seed germination and soil amendment to companion planting and seasonal pruning.
Over the years, Ravuk has gardened through drought summers, waterlogged springs, and pest invasions that would make most gardeners hang up their trowels for good. Those hard seasons, he’ll tell you, taught him more than any perfect growing year ever could. He writes from that earned experience—covering vegetable growing, ornamental planting, houseplant care, composting, and garden design with equal confidence and curiosity.
Philosophy & Approach
Ravuk’s approach to gardening is rooted in practicality. He favors organic methods not out of dogma, but because they work long-term—resulting in healthier soil, fewer inputs, and stronger plants. He has a particular fondness for heirloom vegetable varieties (the kind with proper flavor), unruly cottage-style flower beds, and the stubborn houseplants that everyone else gave up on.
The Mission: Give readers the honest, experience-backed advice that helps them actually succeed in their gardens—not just the ideal version, but the real one; weeds, failures, and all.
Education & Credentials
-
B.Sc. in Horticulture Science
-
Greenfield Agricultural University
-
Focus: Plant Physiology, Soil Ecology, and Sustainable Crop Production
-
-
Master Gardener Certification
-
Cooperative Extension Service
-
Focus: 200+ hours of hands-on practical training and community garden work
-
Continuing Education
-
Organic Pest Management
-
Native Plant Landscaping
-
Sustainable Crop Production